Page 1 of 2
Adjusting the coin grinder
Posted: Mon Sep 14, 2015 4:19 pm
by NickDB
Having reconnected the 5-prong plug (soldering) and connecting it to the coin unit mechanism,
I decided I could move on and start work on the coin grinder.
After doing some serious cleaning, lubricating and so on, I inserted the half dollar grinder in the wurlitzer 2000
in the daft hope it would have simply worked. Of course it didn't.
The coin moves smoothly from top left to bottom right, landing on the paddle which works as a lever,
creating movement on the switch. However, upon reading the manual and setting it up at 1/32" space,
the coin mechanism is not adding up. Any thoughts on why this might be ?
The manual states:
Coin switch adjustment on the slug rejector should be accomplished by setting the blades of the switches and the switch actuators to provide about 1/32” opening of the contacts when the paddle end of the actuator is held against the coin exit by outward tension of the movable contact blade. The object is to maintain point contact during the entire time that the coin is passing the coin switch actuator. As shown in Figure 11 a thin quarter should, after being stopped at the coin paddle by blocking its way, pass slowly thru the critical point shown in Figre 11 by its own weight. There should be no current flowing in the coin circuits when these tests are made.
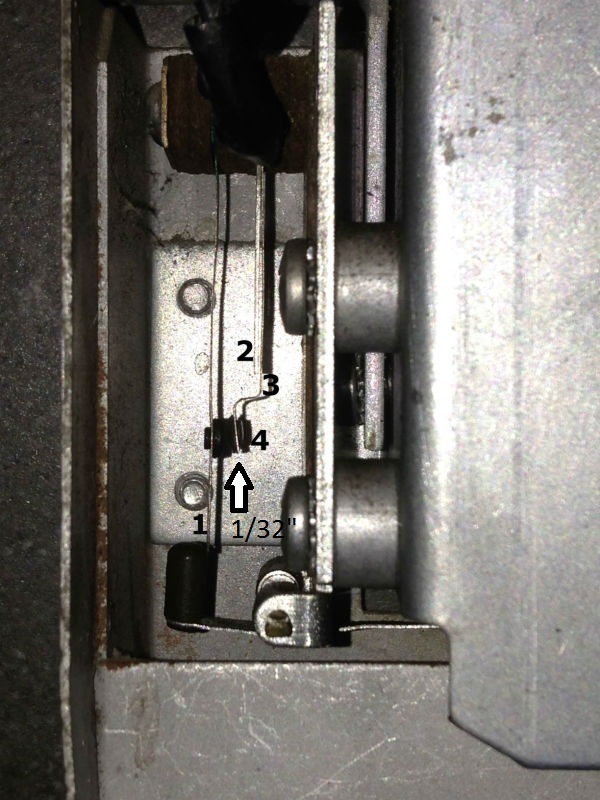
At rest, the contacts (4 on the photo) are seperated from each other by a thin layer of air.
When the coin falls through, the paddle moves and blade 1 moves, making the contacts (4) touch each other.
By the movement also blade 3 is pushed back, completely loose from the stiffer blade 2.
The contact between these two spots (4) is short, since the coin is moving quite quickly.
Did I read the manual wrong, and what is the function of the stiffer blade nr.2 ?
thanks in advance, I'm nearly there, I can feel it

Re: Adjusting the coin grinder
Posted: Mon Sep 14, 2015 8:18 pm
by Ron Rich
Hi Nick,
It appears ( this may be due to the photo?) that blade #1 is curved, and it would hang up on the actuator ?
I would think it should hang straight down, and that the actuator would be "higher up" to operate more smoothly, against the switch blade.
Also, hard to judge the spacing between the contact points--and if they are "clean". or not ?
The "stiffener" should do exactly that--the blade next to it should be biased so it is "hard" against the stiffener, then the stiffener should be adjusted to achieve the required gap.
HTH, Ron Rich
Re: Adjusting the coin grinder
Posted: Mon Sep 14, 2015 8:28 pm
by NickDB
Hi,
yes, blade 1 is indeed curved.
When the lever (the actuator I take it ? the little pointy thing) is not touching blade 1,
for example when I move it under blade 1 to either left or right, blade number 1 jumps left because it is bent.
I made an "obligated" contact by setting a coin in the paddle and preventing it from falling into the cash box below
by holding it back a few seconds to see if anything happens, but it did not.
I'll clean the contacts and try straightening the blades and get back to you on this.
For once the manual isn't as clear as it could be
Re: Adjusting the coin grinder
Posted: Mon Sep 14, 2015 8:58 pm
by Ron Rich
Hi Nick,
"Service Manuals" are never as clear as they should be--and in MOST cases, are written prior to having had any "experience" with the product.
I'm going from my great, but not too long memory here-- When those contacts close, doesn't that start an AC motor ? If so, is the motor getting power--is it "stuck"--has it been properly oiled lately ?? Ron Rich
Re: Adjusting the coin grinder
Posted: Tue Sep 15, 2015 9:00 am
by NickDB
Hi Ron,
I cleaned the contacts (never realized they were actually metal coloured instead of black),
and adjusted the switches to the best of my abilities. The paddle is now resting softly against the blade,
and when the coin falls through the contacts make contact, pushing the blade against the coin grinder
and leaving the stiff paddle (2), after which it returns to it's original position.
So far so good.
However, nothing happens...
I again tried closing the contacts manually a bit longer but there is nothing happening, no extra
sound or movement happening anywhere in the system.
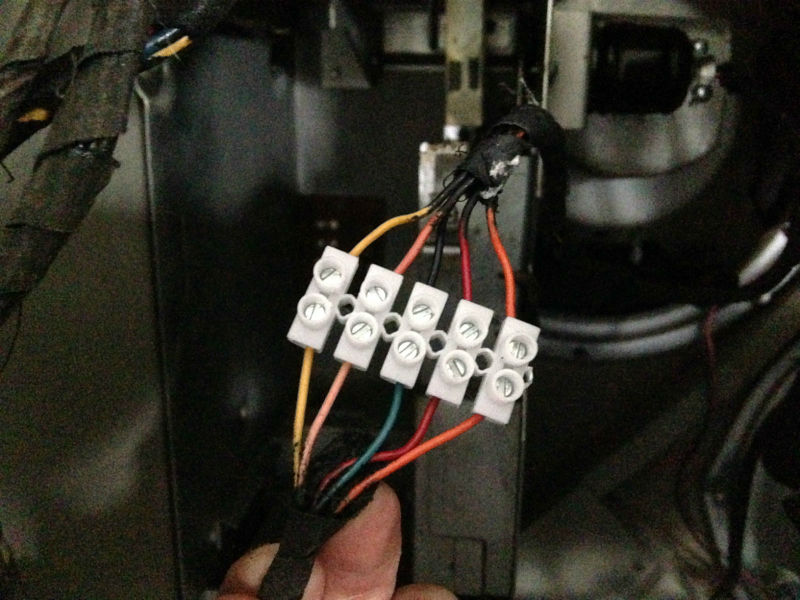
Am I correct in assuming there might not be power going to the cover assembly and the copper contacts inside the assembly ? I already cleaned those contacts, and the cables running to it have been reconnected (color on color).
I was thinking in making a manual contact between these contacts inside the assembly, using a thin copper wire or screw driver.
If that doesn't work I'll see if I can loan someone's equipment to measure if there is any power at all.
kind regards , Nick.
Some pictures

Re: Adjusting the coin grinder
Posted: Tue Sep 15, 2015 4:25 pm
by Ron Rich
Hi Nick,
Didja check the motor as I wrote above--??
How didja "clean" contacts (see "sticky" info. above on how I, and others, do it)
Yes, you will need a meter to check motor power--it can be "lost" anywhere--must trace it out, using schematic, or following wires--
Ron Rich
Re: Adjusting the coin grinder
Posted: Wed Sep 16, 2015 6:00 pm
by NickDB
I cleaned the contacts with propanol, which dissolves oil, and gently "polished" the contacts.
I have now done a measurement with the ohm meter.
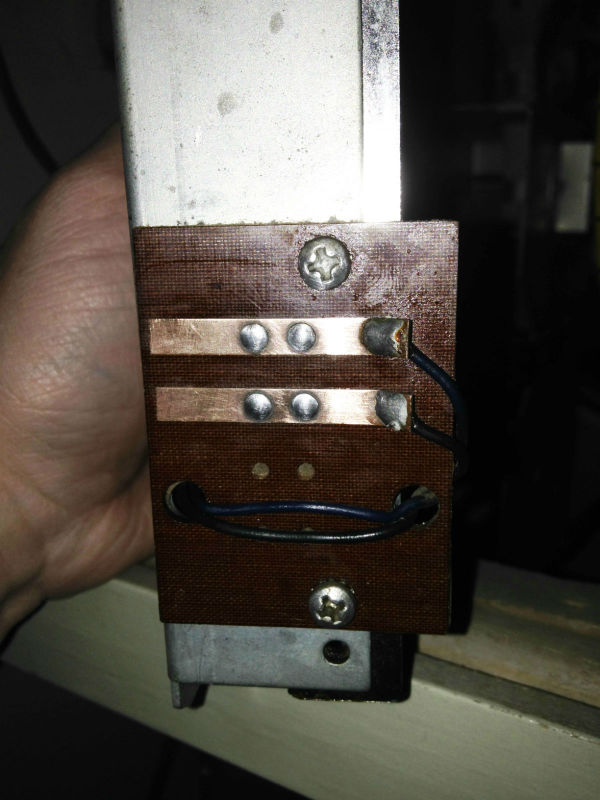
It reads zero when I close the contact on the coin grinder, keeping the contacts of the meter at the copper plates at the back.
When I again remove the coin or let the lever rest at it's normal position, the ohm meter reads 1, so no contact can be made.
The coin grinder is not the issue.
However when placing the meter contacts, on the copper contacts inside the coin grinder housing, I get a consistent "1", a large resistance.
Even though I connected the wires color on color, this leads me to believe that some wires have been crossed and some parts are not getting the signal they should.
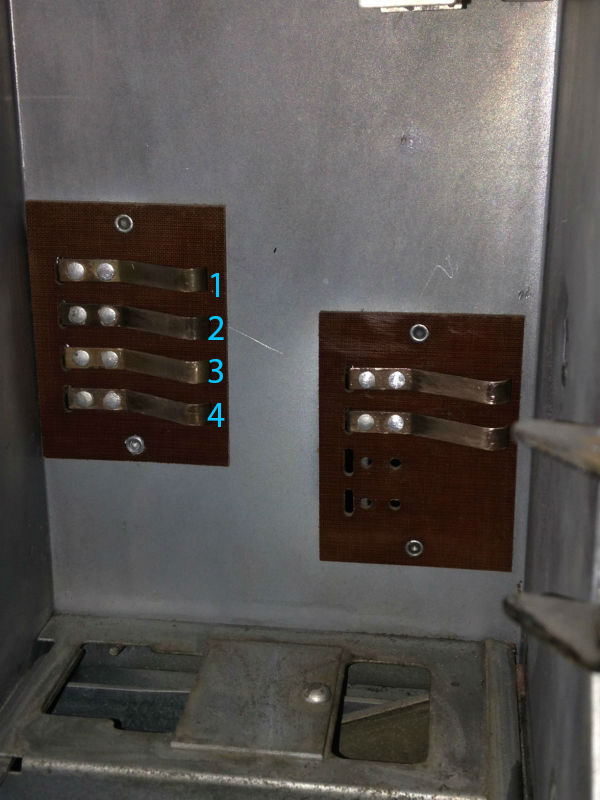
For instance, when I measure the 4 copper contacts of the 5-10-25 cent grinder, I get a 0 when I connect the ohm meter to
contacts nr.1 &4, and 2 &3. I'm still at work at the moment so haven't got the manual with me, but I take it this should also be a 0 between copper contacts 1&2 and 3&4.
Re: Adjusting the coin grinder
Posted: Wed Sep 16, 2015 6:44 pm
by Ron Rich
Hi Nick,
OK--you have me confuzzed--but that's easy !!
A resistance reading of "zero", on an auto-ranging digital meter is an open. Any contacts that are "closed" should read around 0.02, if functioning as they should. If you are not using an auto-ranging , or analog meter, are you sure the range is correctly set ? Ron Rich
Re: Adjusting the coin grinder
Posted: Wed Sep 16, 2015 10:54 pm
by NickDB
well to make things even more confusing... The freeplay stopped working suddenly altogether as well.
A short summary of what I've been up to:
This is the (I agree, ancient) multimeter I have been using, with it's settings.
I have to confess that this is all new terrain for me so I thank you for your patience in advance...
.jpg)
The coin grinder itself gives the results I'd expect, I don't think the problem lies there.
So I went back upwards, to my "restored" coin unit mechanism from which the coil etc were missing a few weeks back.
I figured out that there too were similar contacts, as in the coin grinder, that were black instead of shiny silver/copper/metal.
So for the past hours I've been cleaning them again, here's the progress I've made...
From this:
.jpg)
.jpg)
To this:
.jpg)
.jpg)
However, I am very unsure of what, where I should measure to pinpoint the fault.
I believe that the coin grinder simply doesn't get power...
.jpg)
When closing the system again, I noticed that I could no longer select any songs,
even though the spring was reversed so it was set to freeplay.
When I set the spring in the correct position so it would add up and substract correctly, I threw in a half dollar coin but nada, zip, niente...
So, trying to get it to freeplay again and call it a night, I reversed the spring again and oddly enough when I
closed the coin unit mechanism the freeplay was simply gone. Upon closing the rak a bit harder then usual, "the click" happened and the select button was working again. I decided I wanted to give it one more try with a coin, so I reversed the spring again, nothing happening when I threw in a coin, and returning the spring to the freeplay mode.... after which the freeplay was no longer working.
When cleaning the contacts I probably set them apart too far, but I will dig deeper into that tomorrow.
But, short version, I still don't know what is causing it... Hope these pictures help !
Nick.
Re: Adjusting the coin grinder
Posted: Thu Sep 17, 2015 4:54 pm
by NickDB
Hi, I just filmed what happens when pushing some connectors, there is indeed a motor of some sorts running when I make contact with the first relay.
The second one is needed to make it possible to choose songs.
https://www.youtube.com/watch?v=XZah8maWt5II have now adjusted that second one, so that the brackets are closer to the magnet, they were a bit further apart after cleaning.
When I push it like in the video, it stays magnetized and the relay closes.
When I remove power from the jukebox the magnet comes loose, but upon repowering the system there is no attraction anymore
and I need to manually make the connection, which I didn't need to do at first...
Re: Adjusting the coin grinder
Posted: Thu Sep 17, 2015 6:40 pm
by Ron Rich
Nick,
I have not seen too may 2000's--so I'm going from an old memory, as I do not have a manual--
Looks as if you have a "coin grinder" AND a "play rac" (Utoob vid) in there--the play rac appears as if it's set on"free play".
The "coin grinder portion" should hold the coin on it long enough to add whatever that coin should add to the Play rac. The motor should run during the time the switch ( in 1st photo) is closed, and the coin should drop through to the cashbox, just as the motor stops. Have you checked/oiled that motor ??
As the key switch appears closed on the play rac, you should be able to push buttons on the keyboard and make a selection..
Look at the latch bar coil plunger--, if not inside the coil, give it a slight push, it should "lock in". Does it ??
Ron Rich
Re: Adjusting the coin grinder
Posted: Thu Sep 17, 2015 10:09 pm
by NickDB
sadly I won't have much time the next few days since I'm on a short weekend break but I Will get back to you on this.
I am going to do one more check now, but when I close the contact I hear the motor, but I
can't even pinpoint where the sound comes from or what it is ?
When I close the second switch, I was wondering, is the "guard" underneath the thing that becomes magnetic and pulls the switch,
or is it the contacts on the lower switch that gets magnetic, and then pulls the top down so it makes contact on the guard ?
cheers, Nick, and talk to you very soon...
Re: Adjusting the coin grinder
Posted: Fri Sep 18, 2015 12:30 am
by Ron Rich
Hi Nick,
Not sure what you are calling the "guard" ?? Relays have a few basic parts--coil, and center post, armature, contacts.
Armature, is the flat part that is pulled down when energized--
Ron Rich
Re: Adjusting the coin grinder
Posted: Fri Sep 18, 2015 6:29 am
by NickDB
Hi I mistyped. The armature pulls down and touches somerhing labeled guardian, a round yellow stickered magnet. It is set to freeplay, but i need to make manual contact. When i do it is magnetized, and i can play one song, after which it releases and the select light at the front goes out. Will have a better look in a few days.
Re: Adjusting the coin grinder
Posted: Fri Sep 18, 2015 3:57 pm
by Ron Rich
Hi Nick,
That round yellow tape is around the magnetic coil. When power is applied that coil attracts the armature, and pulls it down, thus, making any 'opened" contacts close, and any closed contacts, open.
Once again, going from my memory--you need to check the schematic on this, that relay should be energized any time the "key switch" is closed ( which is all of the time since that unit is set for free play). It is probably interrupted by another relay during the selection process.
You will need to determine if the key switch is making good contact, and if so, which other relay interrupts it, and clean/re-adjust that relay's contacts.
Ron Rich