So if you happen to read my other post you know I burned up a solenoid from the Selector Assembly and am replacing it.
In the meantime I ripped the whole Selector Assembly out and wanted to clean it up and make sure it is working properly.
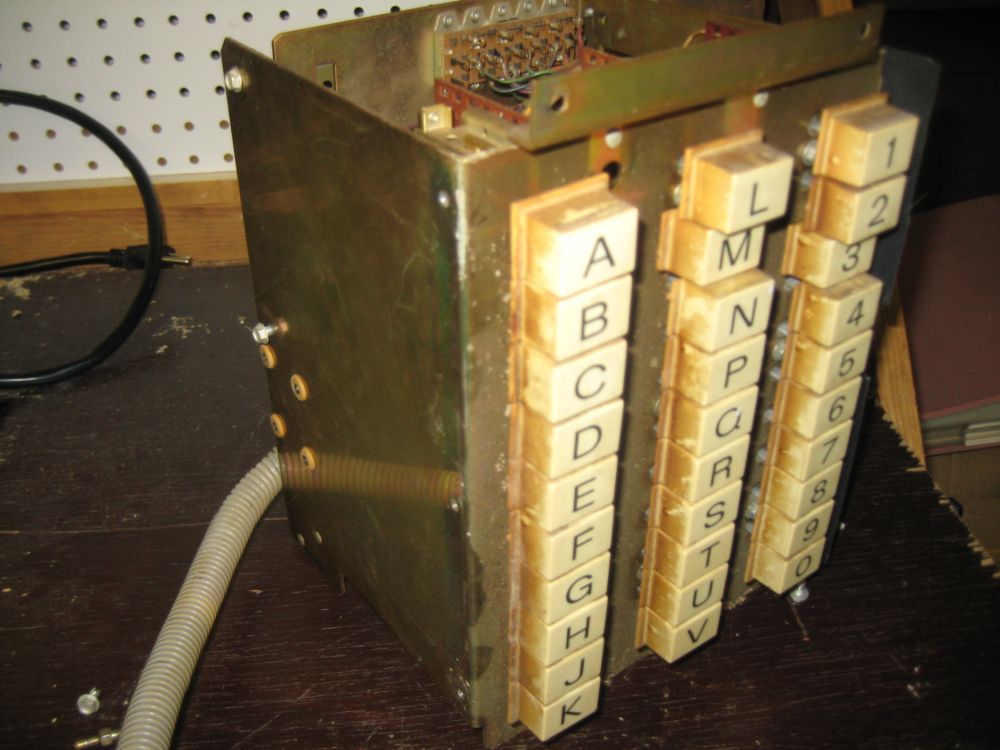
I included a picture to show you what I am up against. Any way to take the letters/numbers off without busting them? I gave a little tug and the caps are on there pretty good.
Besides bad solders, and the obvious dirt and gunk cleanup, is there anything else I should be looking for?

Cleaning up a AMI R-80 Selector Assembly.
Q&A about all types of jukeboxes: Wurlitzer, Seeburg, Rock-Ola, AMI, and more.
-
nline24
Topic author - Regular Member
- Posts: 32
- Joined: Tue Aug 23, 2011 12:58 am
- Location: Ludlow, MA USA
- Attachments
-
- IMG_7209.JPG (99.31 KiB) Viewed 2699 times
Don't take them off. Clean all the contacts while you have it out. Copy down the slide switch settings.
John the Jukebox Man
Hi Nick,
Yes the button will pull off if you feel the need to clean them.
Whilst you have got the keyboard out you might as well clean the the two open relay contacts as well, I tend to just pull copy or writing paper through the contacts to clean the tips of the contacts, you could also use one of those fibre glass pencils.
Do not use sandpaper or files on the contacts or for that matter contact cleaner.
Regards
Alan
Alan Hood
ami-man
UK
-
nline24
Topic author - Regular Member
- Posts: 32
- Joined: Tue Aug 23, 2011 12:58 am
- Location: Ludlow, MA USA
Thanks for the info.
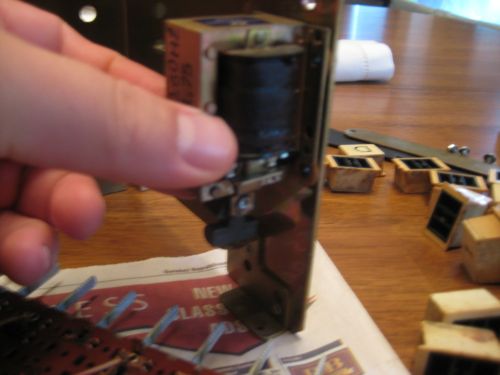
Here is a picture of the solenoid I am replacing and where it sits on the selector assembly housing.
My question is what would be right under the solenoid? Does the solenoid connect to anything? Whatever attaches there I am missing. Pictures in the main service manual do me no good as to what is on the bottom of the whole assembly. Is it just physically a bottom to the assembly?
Also I can see how there is one bar that runs through each one of the banks that when pushed on from the button releases whatever button has been pushed in. When I had the assembly together and working the buttons would only pop out when I would press another button in the same bank causing that bar to move enough that the other button would pop out. What controls theses bars that allow the buttons tom release after pressing them.
- solenoid1.jpg (40.58 KiB) Viewed 2604 times
- solenoid2.jpg (33.01 KiB) Viewed 2604 times
-
Ron Rich
- Forum Moderator
- Posts: 8194
- Joined: Sun May 06, 2007 11:31 pm
- Location: Millbrae (San Francisco area)CA, USA
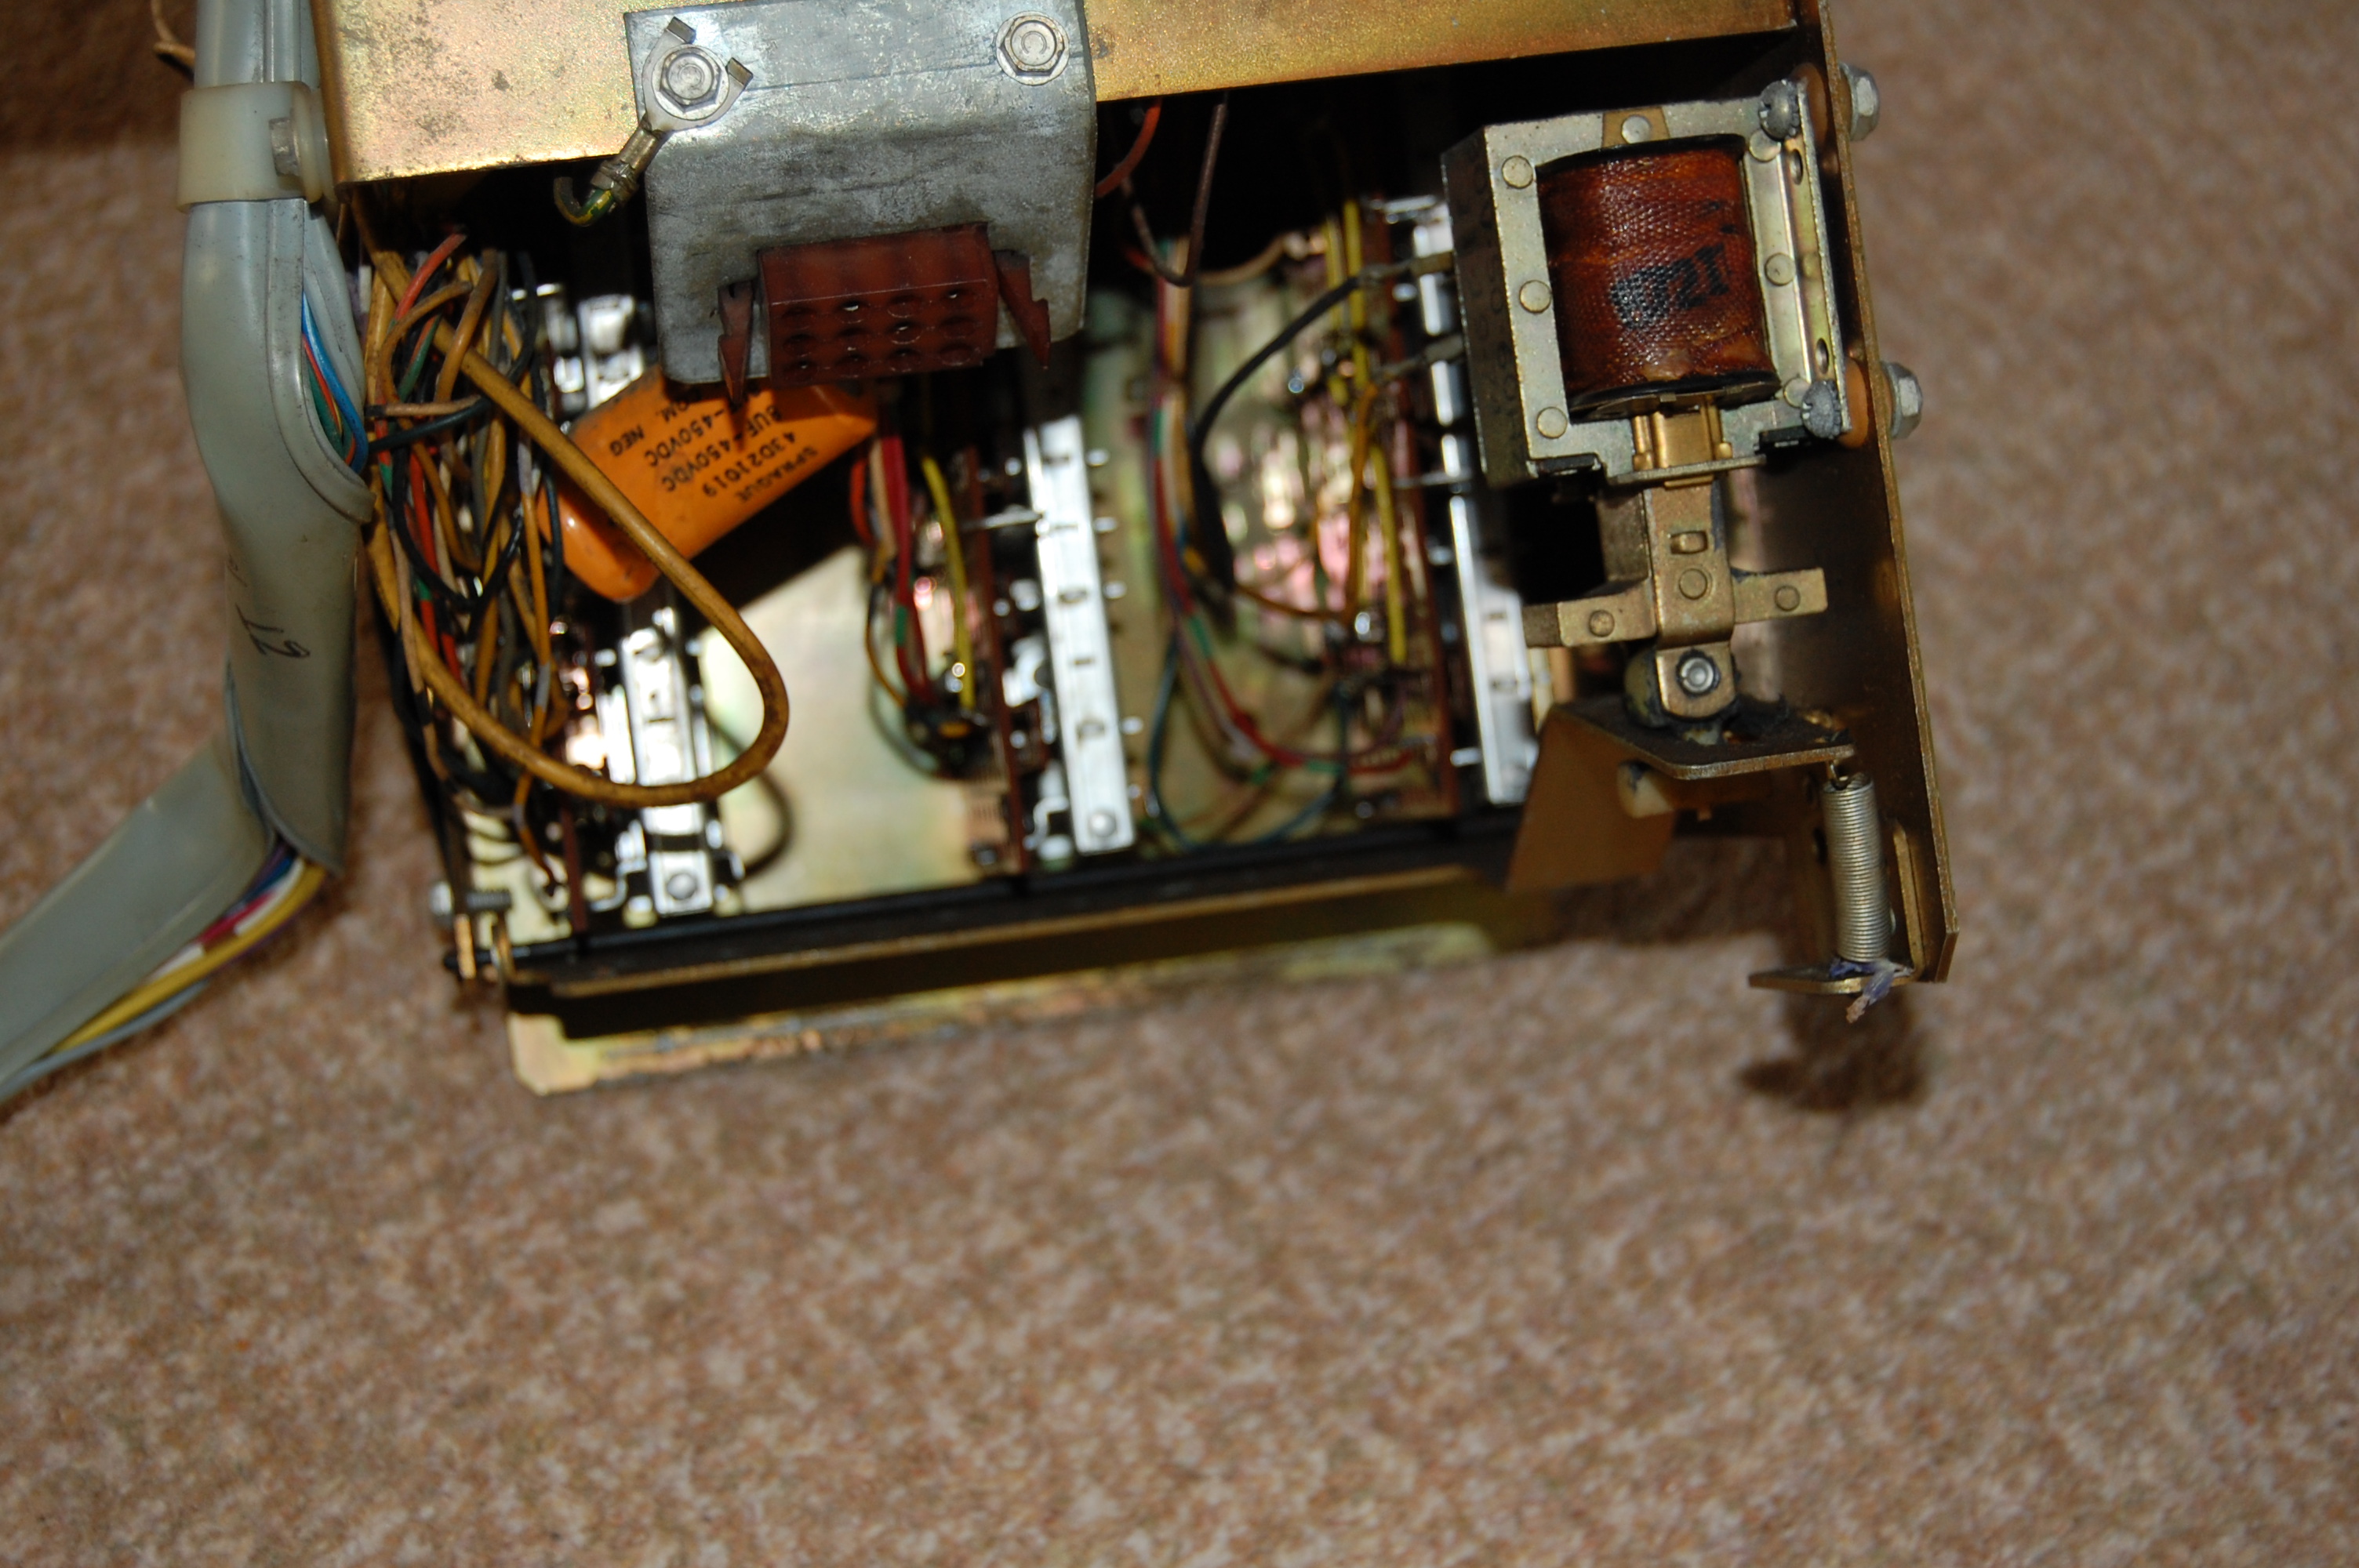
The solenoid you are replacing (generally called a "Latch bar solenoid") is what controls those three bars--there should some type of mechanical linkage from them to the solenoid. Sorry, I do not re-call exactly what was used in every model, but, if you have a parts book, it should show that-- Ron Rich
Hello Nick,
If you have the R-80 manual look on page 7-12 (Fig 3) it shows two pictures of the keyboard (Selector Assembly) as you say the picture is the manual is not great.
Look at the bottom picture it shown the solenoid and push rod marked up as items 24 & 25.
On the end of the push rod (this is the iron that goes into the solenoid) is a plastic molding that goes through the Latch Actuating lever (item marked as 20) this is hinged by a rod that goes through the lever and sides of the selector assembly.
The actuating lever is held down with a spring (marked 16 Tension Spring).
When the solenoid pulls in the pivot action of the actuating lever allows the 3 pushbutton switch assembly's to drop down against the sprung switches enabling the buttons to latch.
I will try and put you some better pictures on the forum over the weekend, or let me have your email address and I will send them direct.
Regards
Alan
Alan Hood
ami-man
UK
alan-hood@datex.co.uk
-
nline24
Topic author - Regular Member
- Posts: 32
- Joined: Tue Aug 23, 2011 12:58 am
- Location: Ludlow, MA USA
My email is nline24@yahoo.com.
Would definitely appreciate some pictures that clearly show what I a may be missing and will hopefully help me understand how it operates.
Thanks again.
Would definitely appreciate some pictures that clearly show what I a may be missing and will hopefully help me understand how it operates.
Thanks again.
-
nline24
Topic author - Regular Member
- Posts: 32
- Joined: Tue Aug 23, 2011 12:58 am
- Location: Ludlow, MA USA
I actually found the latch bar. I had removed it when I first got the jukebox home because it was not attached correctly and was hanging off of the selector assembly by a little spring.
-
Ron Rich
- Forum Moderator
- Posts: 8194
- Joined: Sun May 06, 2007 11:31 pm
- Location: Millbrae (San Francisco area)CA, USA
Photos save a lot of us from having "problems" later---- Ron Rich
Hi Nick,
Here are the pictures of the R-80 Selector Assembly, hope they are ok.
Regards
Alan
Alan Hood
ami-man
UK
Here are the pictures of the R-80 Selector Assembly, hope they are ok.
Regards
Alan
Alan Hood
ami-man
UK
- Attachments
-
- DSC_0201.JPG
- (1.47 MiB) Not downloaded yet
-
- DSC_0199.JPG
- (1.48 MiB) Not downloaded yet
-
- DSC_0200.JPG
- (1.46 MiB) Not downloaded yet
-
nline24
Topic author - Regular Member
- Posts: 32
- Joined: Tue Aug 23, 2011 12:58 am
- Location: Ludlow, MA USA
Thanks a million for the pictures.
It looks like I do have all the parts. Once I get everything cleaned up getting it all back together is going to be the trick.
It looks like I do have all the parts. Once I get everything cleaned up getting it all back together is going to be the trick.
-
nline24
Topic author - Regular Member
- Posts: 32
- Joined: Tue Aug 23, 2011 12:58 am
- Location: Ludlow, MA USA
One small victory!
I put everything back together and included the "burnt out" solenoid just for kicks.
It all works perfectly. The buttons push in and then pop out after selection and I can hear the latch bar/solenoid working.
Apparently the solenoid was not completely shot and seems to be performing without a hiccup. I think the fact that the latch bar was not physically connected caused it to overheat and smoke. At least it wasn't completely ruined.
So that's one thing out of the way. I appreciate all the help and I learned a lot from the whole process.
There seems to be a few other issues going on with the selector system/ when picking songs some are correct but sometimes it picks the wrong songs. I will be doing some research on this and see if I can't pinpoint exactly where the mix up is taking place.
Hi Nick,
You need to check the timing on the mechanism, this is done by manually putting the mechanism in the A1 position and checking that the 200 mark on the stop plate assembly is opposite the the step in the frame that Search Unit fixes onto. This adjustment is in the manual.
Regards
Alan
Alan Hood
ami-man
-
Ron Rich
- Forum Moderator
- Posts: 8194
- Joined: Sun May 06, 2007 11:31 pm
- Location: Millbrae (San Francisco area)CA, USA
Stop-- the "latch assembly being disconnected" will NOT be the cause of the solenoid "smoking" !
That is not a "constant duty solenoid", and you MAY have overheated it, by leaving it energized for longer then it could handle, especially if the juke has been jury-rigged to play for "free".
It is my opinion, that if you "saw smoke", that solenoid is damaged and is a fire hazard ! At the least, I would find the "hot side" and fuse it with a 3 amp fuse--
Ron Rich
Who is online
Users browsing this forum: Bing [Bot], Dewey Holcomb, HorrorBiz 72, Juke-rocks, Scottabs, wcarroll and 6 guests
It is currently Thu Oct 06, 2016 5:18 pm