Seeburg mechanism repair project

Q&A about all types of jukeboxes: Wurlitzer, Seeburg, Rock-Ola, AMI, and more.


Topic author
SteveFury
Regular Member
Posts: 99
Joined: Wed Aug 21, 2013 7:21 am
Location: Atlanta,Ga,USA

Seeburg mechanism repair project

by SteveFury » Mon Nov 25, 2013 11:46 am

I noticed the mechanism in my AY160 began making a repetitive clunking sound and I recognized it as probably being a malfunctioning clutch. I had gone through the manual's lubrication procedure when I first got the jukebox a few months ago. I noticed a couple "to do later" problems as I had more pressing issues to deal with at the time.

My "to do later" has begun today.

I'm applying the best of my general experience in this and hope to get some suggestions. I figured out how to remove the clutch. Geeze what a sloppy dirty mess. I let the whole assembly soak for a number of hours in solvent which cleaned most of it. I used an old toothbrush for the rest. I worked the clutch slide back and forth a zillion times in the solvent and I believe I got out all the sticky gunk.

You can see it came pretty clean:
CLUTCH.jpg
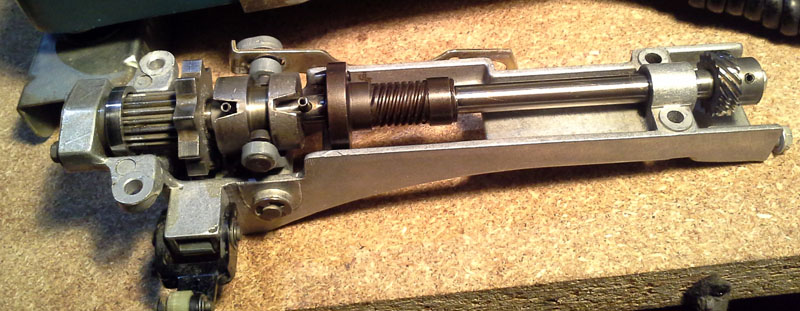
CLUTCH.jpg (104.59 KiB) Viewed 1005 times


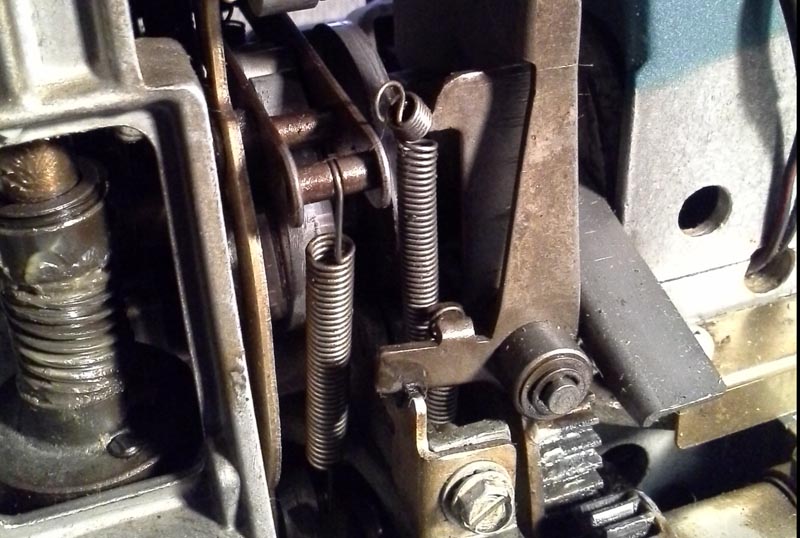
I spent the day cleaning the rear of the mechanism. I found that I can squirt a bit of WD40 on my rag covered finger and it cuts through and removes the old dried oil and dirt from parts. You can see in the photo that I got it pretty clean. I have a question about oil if you don't mind. One oiling point in the manual says "CAM SHAFT BEARING.. FILL OIL HOLE". The arrow in the manual points to a vague area. If you look at my mechanism photo I've put a red arrow. Is this the hole I need to fill with oil?

HOLE.jpg
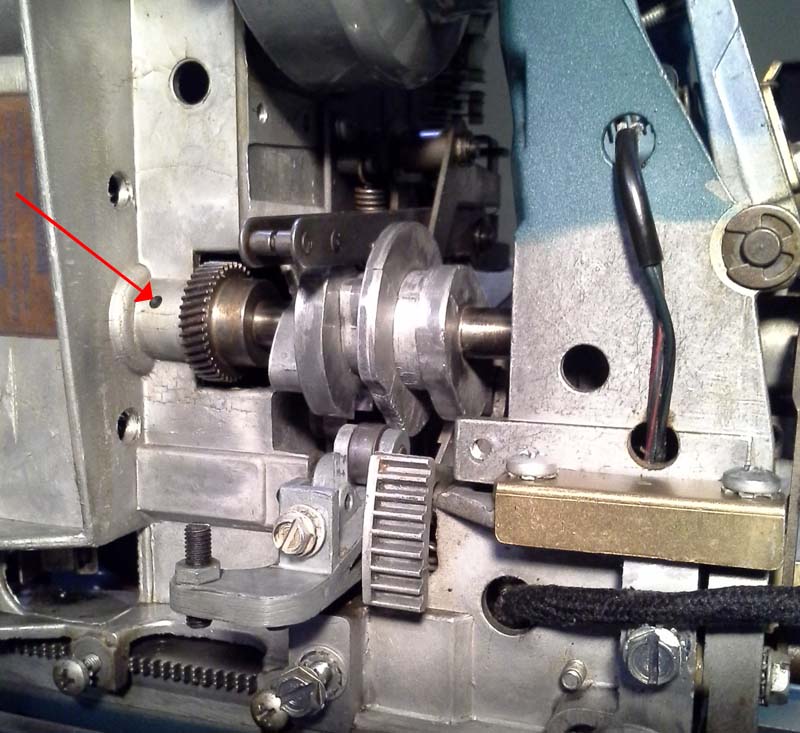
HOLE.jpg (124.47 KiB) Viewed 1005 times


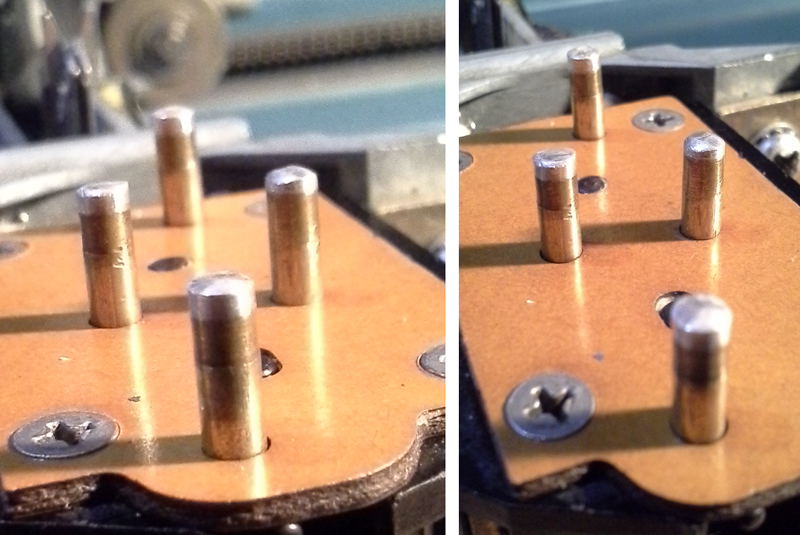
Another thing is this boogered up spring. I think it was probably someone's "fix" for a dirty gummed up and sticking clutch. Gawd I hate when they do those kinds of things because I don't have another spring like it. I have a couple choices. I tried to straighten it out best I can, but you can see on the paper that it is still bent. I can either put it on bent like that, or put it on again the way I found it... except I'd cut the excessive pig tail off.
What would you do?

SP1.jpg
SP1.jpg (107.56 KiB) Viewed 1005 times

SP2.jpg
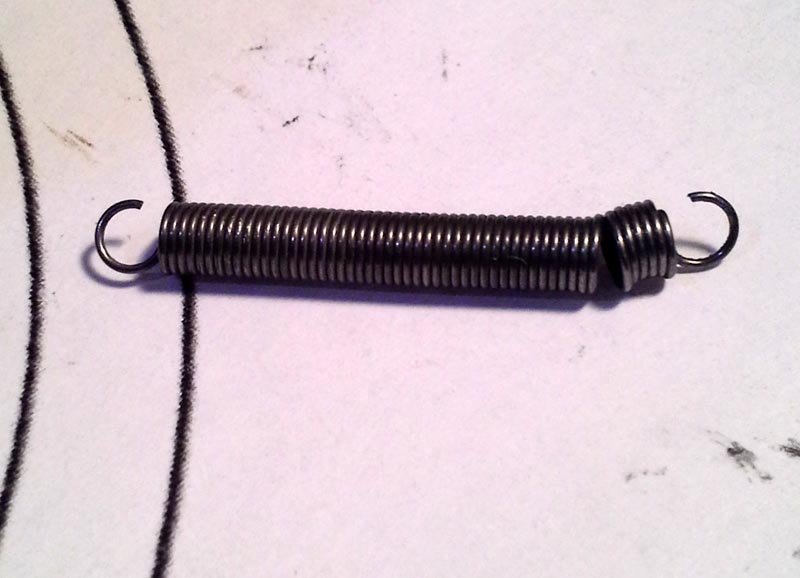
SP2.jpg (65.07 KiB) Viewed 1005 times


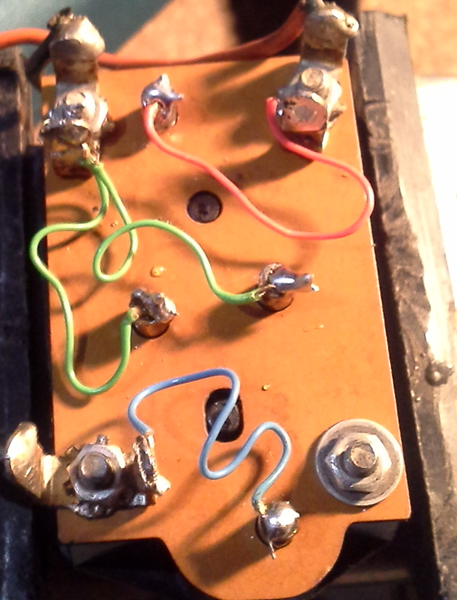
One more question if you don't mind about my detent switch.
I had worked on that switch several months ago, and noticed a pile of burnt material from the switch (evidence of arching) and cleaned it up very well. I've played several hundred selections since then. Today I noticed the pile of burnt material has returned. You can see it in the mechanism photo above.
Is it normal to get these burnt droppings? If not then what can I check for/what causes it?

Thanks for bearing with me on this extended project.
Once I got the mechanism working right and put new silver on the plungers then I can *finally* call this project complete.


Rob-NYC
Senior Member
Posts: 1844
Joined: Sun Sep 25, 2011 3:05 am
Location: Manhattan, NYC USA

Re: Seeburg mechanism repair project

by Rob-NYC » Mon Nov 25, 2013 12:30 pm

Steve, if I may say-so your cleaning efforts are excellent, but removing the clutch is not generally necessary unless the mech is bucking or sits and spins without completing a changing cycle. You will now need to do a full four step clutch setup. NBD.

"Clunking" noises from the clutch can usually be fixed with a minor touch-up of the clutch adjustments.

Those noises may also be excessive play in the turntable bushings or excessive play in the thrust bearing on the t-t shaft.

Try placing the spring back as it should be using the original loop. If the associated bearings are well lubricated the spring will likely work. If not you can remove a couple of turns and form a new loop OR bug Ron to sell you a new one.

On a newly washed mech I'll use that oil hole, but once in service I oil the camshaft bearing from the shaft end next to the motor and a drop or two next to the clutch gear. Oil works it way in.

The crud under the detent contacts is pretty much inevitable. It is a combination of the corona effect of dust being attracted to those contacts by the 300VDC readout voltage and then being combined with ambient oil and thrown off by the action of the switch.

It is nothing to bother with.

Rob/NYC
"If we believe absurdities, we shall commit atrocities" -- Voltaire


Ron Rich
Forum Moderator
Posts: 8193
Joined: Sun May 06, 2007 11:31 pm
Location: Millbrae (San Francisco area)CA, USA

Re: Seeburg mechanism repair project

by Ron Rich » Mon Nov 25, 2013 6:48 pm

Hi Steve,
I would humbly suggest a copy of my "Seeburg Mechanism Guide" would answer many of your questions (PM me to purchase, if you wish)--
Yes--that's the "oil hole" for the cam--but don't forget the other end, next to the brake cam--no "hole" there, just squirt oil on it--When oiling the cam shaft on the oil hole end, from the outside--wipe any excess off, or it WILL get onto the detent switch ( which does cause "problems")!
As for the "shortened spring"--As far as I know, in all the years Seeburg made that basic mechanism, they used very high quality springs, that really do NOT "fail". One exception, that I am aware of was the last production run of the SS-160, and the first production run of the LS-1. Somehow, during this time, a "new bean counter", was hired. This person either changed the spec. on the spring used to lift the clutch, or purchased it from an alternate source. This spring quickly "stretched" in normal use. They re-called and replaced it at no charge--This person also did the same thing with the cam shaft gear--this resulted in me having to change "hundreds" of them (OK--I'm "embellishing"-a little). As far as I know, this person only "won" one "war", in the short time he was employed--he eliminated most of the paint on the mechanism--
Anyway--my point is, unless "overstretched" Seeburg springs will last "forever". Should one feel the need to "shorten them", it is probably due to a "lubrication problem", and IMHO, a very short term cure. I would attempt to "un-boogger", and re-use that spring--without cutting it --if that won't work, it should be replaced. Be SURE the roller it works with is turning !!
"Clunking noises", as Rob pointed out, can come from other areas of the mech, besides the clutch.
If from the clutch, it's a good bet that either "someone" has mis-adjusted it, or it has been run dry for a long time. If the latter is true, the clutch member may be worn out, and, or, either clutch member fork "support pin" has worked itself loose. Ron Rich


Topic author
SteveFury
Regular Member
Posts: 99
Joined: Wed Aug 21, 2013 7:21 am
Location: Atlanta,Ga,USA

Re: Seeburg mechanism repair project

by SteveFury » Wed Nov 27, 2013 4:46 am

Thanks for the replies, your suggestions are very much appreciated.
I hope to buy the mech guide but not at the moment. Probably after the seasons are over. In the mean time...

I got the clutch back in and did the 4 adjustments according to the manual and it seems to be working perfectly through the scan and play modes by rotating the motor shaft. I put the bent spring back in as it should originally go.

Another thing on my "to do" list was to properly fix the plunger block. The original wires were broken or missing and I temporarily soldered some #28 gauge wires a few months ago. They were really too thick and I was concerned they may inhibit free plunger movement. Today I got some thin wire out of an old junk phono tonearm as they more closely resemble what I originally found. I cut them a little long and put a few stress relieving bends so the movement won't break them as easily.
These are low voltage wires in a high voltage circuit and I hope the insulation is good enough. Anyway I tried to space them to prevent arching between them. I think that may be good enough.
Wires.png
Wires.png (403.5 KiB) Viewed 949 times

I had also previously thought the plunger silver tips were gone/wore out. On 2nd inspection they look pretty good to me. The camera wanted to focus on the front or the rear hence two photos. I might eliminate the two center plungers and ground the tormat's center grounding strip through a fuse. I could keep the two plungers as spares.
What do you think about the plunger tip conditions? (I'm not sure what they originally should look like)
Plungers.png
Plungers.png (593.15 KiB) Viewed 949 times


Thanks again!


Rob-NYC
Senior Member
Posts: 1844
Joined: Sun Sep 25, 2011 3:05 am
Location: Manhattan, NYC USA

Re: Seeburg mechanism repair project

by Rob-NYC » Wed Nov 27, 2013 6:44 am

Steve, the plungers look good -better than most of what I have in service.

When replacing the wires I use the ultra-flexible wire used to connect a speaker voice coil to the solder terminals. I've yet to have one fail.

When I used wire similar to what you have, I used a solder vac to clear out the plunger bottom. Then you'll see a hole through the plunger. I fed the insulated section of the wire through that hole then loop it around and tack solder it to the bottom of the plunger. The hole acts as a sort of strain relief.

I do remove the two ground plungers and add a ( 1 amp fast) fuse to connect the center plate to the chassis. This also eliminates the 'squeal" that often occurs as the center plungers travel.

Rob
"If we believe absurdities, we shall commit atrocities" -- Voltaire


Ron Rich
Forum Moderator
Posts: 8193
Joined: Sun May 06, 2007 11:31 pm
Location: Millbrae (San Francisco area)CA, USA

Re: Seeburg mechanism repair project

by Ron Rich » Wed Nov 27, 2013 6:52 pm

Hi Guyz--
The pins look great !--I use a burnishing tool on them to "slightly dome them"--but you should be just fine as is.
Seeburg used the exact same wire on the pins, that they used for tone arm wire.
Rob,---the annoying "squeal", usually comes from a stuck "guide (pressure) roller", under the carriage, or also from the pop meter slides--I have heard it (too) many times, on phono's not equipped with the "pin" type contact blocks. Ron Rich

Who is online

Users browsing this forum: No registered users and 9 guests

It is currently Thu Oct 06, 2016 11:38 am