Wall-0-Matic 200 Rebuild

Q&A about all types of jukeboxes: Wurlitzer, Seeburg, Rock-Ola, AMI, and more.


Topic author
SteveFury
Regular Member
Posts: 99
Joined: Wed Aug 21, 2013 7:21 am
Location: Atlanta,Ga,USA

Wall-0-Matic 200 Rebuild

by SteveFury » Fri Oct 04, 2013 10:58 pm

My "new" WOM 200 model V-3WA-D arrived yesterday. I had won it in an ebay bid a couple weeks ago.

The chrome is in fair condition and it seems pretty much complete except for a lock mech and cashbox, which is what I expected. However I wasn't expecting such a horrible mess inside. Geeze it looked like somebody stood a few feet away and sprayed everything down with oil, then left it in their barn exposed with no cover for a few decades. I don't recall ever seeing such a mess. Somebody made all of the lights to be general illumination, even the credit lights. Cut wires dangling etc.

To do a proper rebuild, I had no choice but to disassemble it far as it would go. I had studied and studied how the push button assembly banks are installed-hence how to remove them but finally came to conclusion they are permanently riveted in. I'm not willing.... at least at this point to do any drilling unless absolutely necessary so the button assemblies were left in.
The top button row (A-K) motor start switch was permanently jammed closed and I found the cam/slot follower for the treadle actuator disconnected on the right side. A quick fix.

Once I had most everything from the frame removed it was time for washing. Both my hands were thick with black greezy "gook" at the time from handling the parts. I took it outside and mixed up a strong liquid tide + water solution and went at it with an old hard textured toothbrush. Scrubbed the frames, buttons, button illuminater etc. I even scrubbed town the wiring harness and was very surprised to see wire colors. Except for a few wires, I thought they were all gray.

I poured the soap solution over the button switch banks and worked each switch in and out a zillion times to try to clean them out. I spent some time doing that. I didn't use any contact cleaner because it is not clear where it should go. That's primarily why I wanted to remove the button banks to begin with. I hope that is enough cleaning.

I wiped all of the frames down with a couple applications of Miniwax furniture paste wax. The product is made with bees wax and protects the metal from further corrosion and improves the general appearance. I am also cleaning the parts and applying the wax as I reassemble them.

I got the motor/cam/disk assembly back in and snapped this progress photo. I applied 25vac to the motor and it works the cams. I am happy with the results thus far.

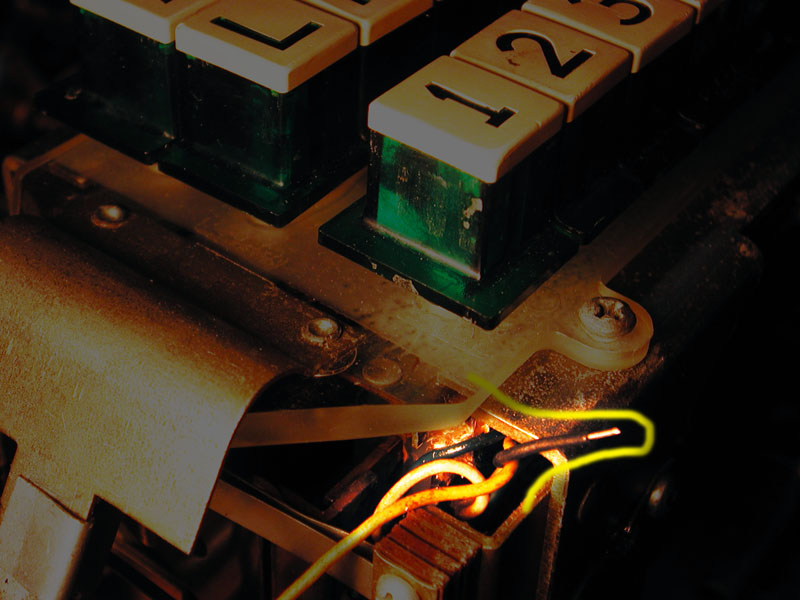
It is going to take me some time to rewire this. There were some wires obviously cut and re-wired to different places, some wires just found dangling etc. I have the schematic so I should be able to get this working again, eventually. Right now my biggest mystery is the two yellow wires coming out of the harness between the button assemblies and the rotor. It would be a huge help if someone could look at their own WOM 200 and tell me what these are for, and maybe snap a photo if possible.
The dangling yellow wires may go to the keyboard light, but I am not sure. Someone completely rewired all the lights.

Some parts of the credit accumulator are frozen, and the coin mech probably doesn't work. But those items are a bit further down the road.

So it's really cool that I finally got my WOM 200, I've been like a kid at Christmas. Even if it's not exactly as I had expected. Well, at least I am learning a lot about them in the process. :wink:

w1.jpg
Progress 10-4-13
w1.jpg (156.81 KiB) Viewed 1192 times


w2.jpg
Mystery yellow wires
w2.jpg (115.96 KiB) Viewed 1192 times


Ron Rich
Forum Moderator
Posts: 8193
Joined: Sun May 06, 2007 11:31 pm
Location: Millbrae (San Francisco area)CA, USA

Re: Wall-0-Matic 200 Rebuild

by Ron Rich » Sat Oct 05, 2013 12:22 am

Steve,
Egg-zact-ly why I don't buy them on EPay--They are usually available from the "usual suspects" (named above) for a "reasonable price"--and these guys KNOW the condition it's in and/or will usually snap a photo for you--
Yellow wires on all WOM's, are for the general illumination lamps-"Hot side"--from the autoformer. Ron Rich


Rob-NYC
Senior Member
Posts: 1844
Joined: Sun Sep 25, 2011 3:05 am
Location: Manhattan, NYC USA

Re: Wall-0-Matic 200 Rebuild

by Rob-NYC » Sat Oct 05, 2013 3:55 am

Steve, in the hundred-plus wallboxes I've bought quite a few have been like what you describe. Wallboxes seem to have been regarded as the 'small change" of the industry and after they were removed were often treated as doorstops. One op that I knew on NY's tenth ave. told me that he would throw them in a dumpster whenever one turned up on his block.

The yellow wires in question are for the keyboard diffuser lights. Those two go together on the center contact on one socket and there should be two black ones for the 'can" contacts. A yellow and black wire run under the inside front of the keyboard frame to the other side's socket.

Do you have the autotransformer for the lights?

Once you are ready the easiest way to get an idea of keyboard contact condition is to connect an ohmmeter between the signal terminal (Blue) and chassis. Then place the wiper on the first rivet going clockwise. This is selection "V0" it places all contacts in the circuit and you'll get a good idea of resistance. Try also tapping the keys while measuring.

Don't be too concerned about seeing some resistance and having it jump around a bit when you tap the keys, the system can tolerate a bit of resistance and it is impossible to get these old boxes to perfect continuity. They do improve with use.

While you have the ohmmeter connected, slowly turn the wiper through it's full rotation noting that you get a reading at each rivet. It is not unusual to find wires broken off the wafer from rough handling

Rob/NYC
"If we believe absurdities, we shall commit atrocities" -- Voltaire


Topic author
SteveFury
Regular Member
Posts: 99
Joined: Wed Aug 21, 2013 7:21 am
Location: Atlanta,Ga,USA

Re: Wall-0-Matic 200 Rebuild

by SteveFury » Sat Oct 05, 2013 9:46 am

Well I did good today.

I have it all together, clean and kinda working.
I say kinda working because I haven't got to cleaning the slug rejector yet and it rejects nickels. I'll sneak it in the next dishwasher cycle when the wife isn't looking :roll: The accumulator wasn't too bad. A drop of oil on each pivot freed the frozen solenoid actuators and ratchets, and I cleaned the fossilized grease on top of the credit wheel to make the contacts work again.
I can drop a coin in, the credit will make the tally and the motor cam moves to the credit position. I make a selection, the motor runs through its cycle and the buttons pop out as usual just before the motor stops. I also have the credit lights wired and working properly.

I connect my AY160 and the WOM rarely makes any selection and if it does it's always in the first bank, usually 1A-1C no matter what is selected on the WOM. I did the resistance test and every rivet shows either dead short or close to it with all buttons out, measured at the blue signal out wire to gnd. I didn't do a button jiggle test.
When it's connected to the receiver and the wiper is sweeping, I can hear the receiver relays either chatter like a it's a bad connection or not respond at all to the wiper position. Strange the rivets show a short when I slowly, manually rotate the wiper yet seems to fail to work the receiver.

Rob or Ron mentioned in another post that it is good to use a coffee filter to clean the rotor contacts, because it won't damage the silver plating. I wanted to mention my rotor contacts are not silver plated (at least not now) they are brass. Looking closely at the contacts there is no sign that it ever had silver plating. Either someone really cleaned it off very well or it never had brass plating (If they ever made any without the plating)

There's also the fact I did not rebuild the receiver (new caps, check resistors etc) when I rebuilt the Tormat controller. Perhaps that could be the issue. However I had been using a microswitch from receiver gnd to blue signal for a couple weeks to "manually" make selections and that seemed to work alright. I'd quickly do maybe 10 or so pulses on the switch, a brief pause then 3-8 more pulses and it seemed to select across all groups. It's unusual to use a switch like that I know, but I could make random selections with it.

There's a mystery black wire which comes out of the small harness near the left side of the number selection buttons. (pic). Rob mentioned " A yellow and black wire run under the inside front of the keyboard frame to the other side's socket." this mystery wire is probably the original black wire to the light but I can't be absolutely positive. I ran my own ground for the selector lights. Thank you very much for that information, I was almost crazy trying to track that wire down with a meter.

Is there any problem with me using #47 illumination bulbs? They are brighter than what was found in there and I have tons of them from my pinballs.

Thanks for the replies Rob and Ron. Yep, I have the transformer. The only parts I don't have are the cash box and lock parts. The unit is all back together.
Attachments
1.jpg
1.jpg (105.55 KiB) Viewed 1142 times


Rob-NYC
Senior Member
Posts: 1844
Joined: Sun Sep 25, 2011 3:05 am
Location: Manhattan, NYC USA

Re: Wall-0-Matic 200 Rebuild

by Rob-NYC » Sat Oct 05, 2013 11:09 am

Steve, if you have not rebuilt the stepper section it won't work properly. The large 5mfd cap will likely need replacement.

You can buy a similar oil filled one, or use mylar caps as I do. See pic:

http://www.fileconvoy.com/dfl.php?id=gd ... b8c2f6912d

This cap must be within 10% of 5 mfd or the stepper will occasionally miscount.

All contacts on the relays should be checked for oxidation and pitting. The roller contacts on hte letter stepper:
http://www.fileconvoy.com/dfl.php?id=gc ... 1aa6b83756
-need to be de-pitted and must transfer during the second pulse. The roller should follow the wheel just far enough down along the "at rest" notch to keep the roller centered and the top contacts engaged.

You can use my coffee filter suggestion to clean the stepper contacts. I use a little silver polish followed by WD-40 applied with some paper -NOT sprayed.

Use light machine oil on the stepper bearings and ratchet dogs. I don't recommend lubing the stepper clappers unless they are gummy -then only use some very light lube again, WD-40 sparingly applied is Ok here.

On the second pic you'll see some "X"s on the #2 timing relay. These contacts remove the W-I pulse from the keyboard while the stepper is pulsing. I eliminate them, but for home use this is not necessary.

------------------------------------

On you bottom wallboc pic I note a set of contacts on the keyboard assembly. Those were for anti-cheat and must be open except briefly at the end of a cycle. They serve no useful purpose and I cut the blue signal wire to them and remove the switch.

Another odd bit of engineering is that Seeburg carried the signal line into the credit unit. this can place a dead short on that line when two credits are added. The connection comes from single colored wire on the wafer between the letter and number rivets. It may be white, blue, brown or grey. I cut that out as it will cause problems.

As a final test on the wallbox signal line I use a 28 volt bulb connected between the 25vac and blue (signal) screw. This is to test for correct number of pulses and transfer interval.

Rob
"If we believe absurdities, we shall commit atrocities" -- Voltaire


Ron Rich
Forum Moderator
Posts: 8193
Joined: Sun May 06, 2007 11:31 pm
Location: Millbrae (San Francisco area)CA, USA

Re: Wall-0-Matic 200 Rebuild

by Ron Rich » Sat Oct 05, 2013 6:30 pm

Hi Steve,
I think maybe Rob has been smokin' something here :roll: --I have seen thousands of those rivets--never a drop of "silver" do I recall seeing--all brass !
I do agree with the rest of what he wrote, however--the "stepper portion" (RCSU) must be attended to--the 5uf cap MUST be correct, and the "300uf" must also be "right". Also, check the resistor values on the 2050 tube.
One caution I would add ( I know Rob said not to do this, but I want to make it real clear) --Do NOT "SPRAY WD-40" into the stepper (or IMHO, use it, anywhere near the jukebox!). To "clean" the rivets, both in the WOM , RCSU, and on the TMU, I prefer a "plastic safe-safety solvent--non residue" type, and a napkin/paper towel, saturated with the cleaner. To "lubricate the rivets", I use DeoxIT 5.
Ron Rich


Rob-NYC
Senior Member
Posts: 1844
Joined: Sun Sep 25, 2011 3:05 am
Location: Manhattan, NYC USA

Re: Wall-0-Matic 200 Rebuild

by Rob-NYC » Sat Oct 05, 2013 11:39 pm

Ron, I did not mention them being silver- only that i use silver polish. The instructions I've seen do mention them being silver plated, but like you, I've only seen them brass.

Either way they work......

Rob
"If we believe absurdities, we shall commit atrocities" -- Voltaire


Topic author
SteveFury
Regular Member
Posts: 99
Joined: Wed Aug 21, 2013 7:21 am
Location: Atlanta,Ga,USA

Re: Wall-0-Matic 200 Rebuild

by SteveFury » Tue Oct 08, 2013 11:36 am

Ok you guys are great.
I rebuilt the receiver with all new caps. The 100 ohm 2w resistor was open so I replaced it too. The other resistors were ok. I cleaned all the relay contacts and put a drop of light oil on the letter/number rotor pivots and ratchet dog ears. The only thing I ever use WD40 for is to "wash out" the electric hair clipper after a hair cut. :roll:

The WOM selects all 8 banks (1-8) correctly. It will intermittently miss count one pulse on the upper letter row A-K and is always off by one single pulse on the lower row L-V. For instance choosing the last selection V8, U8 is played. I have a resettable 24v counter somewhere outside in the shed I plan to find tomorrow and use it to count pulses from the WOM. That way I hope to isolate the issue to either the WOM or receiver.

My local parts supplier didn't have a 5uf 300V cap. I bought two 10uf 160v electrolytic caps and made them in series to make 5uf/320v. I assume that is alright. Also they didn't have 300uf, so I put in 330uf. I understand early 60's caps had a wide production tolerance so I am hoping the 330 is Ok.

I have more work to do on the WOM anyway.
It no longer moves the cam to the "credit" position even with enough credits accumulated. The accumulator works the credit lights correctly, and subtracts for a vend. Hmm. I'll need to track that one down.

Thanks for the suggestions, I think this is on the road to complete success.


Rob-NYC
Senior Member
Posts: 1844
Joined: Sun Sep 25, 2011 3:05 am
Location: Manhattan, NYC USA

Re: Wall-0-Matic 200 Rebuild

by Rob-NYC » Tue Oct 08, 2013 12:41 pm

Looks like you are making progress.


Some points on your remarks:

1) The wallbox can be ruled out as the source of inaccurate selections if you do the light bulb test and look for consistent flashing. An addition to that test is to connect the light from the 24vac line to the signal terminal -but don't connect the power to the wallbox. Manually turn the wiper through a cycle and make sure you have continuity and the bulb lights at each rivet.

2) Failure to step up to credit is usually due to the upper cam contacts behind the wafer. There are three with a center one traveling. At rest the center-outer blades make. At credit the center is between the outer-inner two. During a cycle the inner-rear contacts make to carry over the motor to the rest position. The blades are adjusted by -carefully- bending them.

Another possibility here is that the contacts on the credit wheel need to be slightly shifted. BTW: Do you have all the taper leads on the "Singles" pricing? that is the small board above the credit unit.

As I mentioned earlier the 5 mfd must be within 10% or the stepper will often miscount. Using back-to-back electrolytic caps (this is an AC circuit) is OK IF you test the final value to be sure it is accurate.

With heavy use the tiny spring on each clapper may weaken enough that it no longer pulls the ratchet back quickly enough between pulses.

Another thing to check is for adequate overtravel of the ratchets to be sure the wheel teeth are kept in place by the dogs between pulses. The clapper coil assemblies move slightly to allow adjustment.

Be sure the dogs are totally free and instantly snap back when lifted.

Residual magnetism can also cause clappers to not release in time, but I've not found this to be common.

Failing 2050 tubes are a common source of this problem (and why I eliminated them 20+ years ago).

With a wallbox sending observe the top area of the 2050 tube. All pulses should be deep violet/blue not sky blue.

The 300mfd is the hold time constant for the hold magnet. Using a larger one just keeps the hold from releasing the stepper wheels longer. NBD.

I use a half-watt 100 ohm resistor on the stepper plate circuit to act as a fuse and protect the stepper coils in the case of a short on the signal line. Probably not really needed at home.

I'm not a fan of mechanical steppers, but I have come to appreciate the fact that they can always be repaired as opposed to the digital systems that rely on custom programmed EPROMs and other ICs that "just happen" to become NLA once the 5 year required support period ends.

Rob/NYC
"If we believe absurdities, we shall commit atrocities" -- Voltaire


Ron Rich
Forum Moderator
Posts: 8193
Joined: Sun May 06, 2007 11:31 pm
Location: Millbrae (San Francisco area)CA, USA

Re: Wall-0-Matic 200 Rebuild

by Ron Rich » Tue Oct 08, 2013 5:59 pm

Hi Guy's,
While I concur with most of Rob's points--I disagree on the spring issue. I have been fixing Seeburg "steppers" since 1967, and I don't believe I have ever seen a "weak spring"--unless some "gepetto" has overstretched it (lotza "gepeto's in NY ?? :lol: ) ! I have seen a few where the contact blades have been "adjusted" ("jukebox guys do not "bend" things--just "reform them"), to a point where they are putting too much pressure on the relay for it to function properly. Most failures of this type I HAVE found to be caused by residual magnetism.
A long time ago, an old farmer brought his stepper into my shop and stood there while I was attempting to trouble shoot it. He watched me determine that the problem was residual, and I told him that I was going to the parts dept. to get a new relay. At that point, he stopped me and said "wait a moment". He went out to his truck, and came back in with a roll of Mylar tape. We cut a little section and used "contact cement", to glued it to the armature, at the point of contact--fixed that problem pronto ! I still have, and use that roll of tape today. It's the type farmers use to scare birds away--extremely thin, about a half inch wide, colored "chrome" on one side, red on the other.
I also don't believe I can tell the "condition" of a 2050 tube by flash color--but, I am somewhat shade blind, and perhaps others that see better, can ? One thing I have learned about a 2050--not an A, or B version, is that after long usage, the top will turn black. If this has happened, I tend to replace it at that point.
As for the 100 ohm 1/2 watt resistor--IMHO, it's a great idea--only one caution--use a carbon, not a "flame proof" type, or there is no advantage. Ron Rich


Rob-NYC
Senior Member
Posts: 1844
Joined: Sun Sep 25, 2011 3:05 am
Location: Manhattan, NYC USA

Re: Wall-0-Matic 200 Rebuild

by Rob-NYC » Wed Oct 09, 2013 5:00 pm

I disagree on the spring issue. I have been fixing Seeburg "steppers" since 1967, and I don't believe I have ever seen a "weak spring"--unless some "gepetto" has overstretched it (lotza "gepeto's in NY ?? :lol: )


Well, I'm glad to hear it's rare, but I did have that twice. First on a TSR-# going into an HVL in Aug '93. Everything washed-rebuilt, stepper set up properly. Letters were often missing. I observed good clapping action, used a Neuses gauge on the little top spring that pulls back the ratchet. It was noticeably weaker than those on the NOS steppers I have. Changed spring and it is still running there.

Next time was in 2000 on the modded K. That one went into service in Oct '98 and gets heavily used. Letters became unreliable. Didn't see a problem and didn't have my gauge - I did a Geppetto and cut off two turns of the spring and refashioned the hook end. It is still working.

I did have a magnetism prob on the HVL two weeks ago. The machine would not launch sometimes when a selection was made and. The stepper made the right noises and then looked OK w/cover off. Since I hadn't serviced it in about 7 years I went through the relays and wafers cleaning-depitting checking.

When I got to the transfer Ry I felt the action was 'sticky" when I pressed down on it. It actually wanted to stay down at one point. I took the top assembly off, cleaned the core and lightly roughed up the peened spot that developed on both core and striker. No more hesitancy. My guess is that would get stuck over the interval and all the pulses would pile onto the letter wheel. No transfer to numbers-no timing relays-no W-I or scan. It is fine now but I think I'll try your suggestion with a piece cut from a Metrocard.

If you want a more wasteful example of residual magnetism, look into the HP 2500 series of color laser printers. I use these for title cards and strips. I've found 4 of them, two had the infamous "only prints yellow" problem. This turned out to be a small indexing solenoid that was built like a relay b/no contacts. It's function was to detent the wheel with the toners accurately. HP placed a thin piece of adhesive backed foam on the striker to kill the clicks. In 3-4 years that foam deteriorates and the tape punches through to the adhesive. It takes about 15 mins to take apart enough of the machine to get at the solenoid but the fix is obvious.

Who knows how many tens of thousand of those otherwise good machines were dumped because of that stupid bit of engineering.

Rob
"If we believe absurdities, we shall commit atrocities" -- Voltaire


Topic author
SteveFury
Regular Member
Posts: 99
Joined: Wed Aug 21, 2013 7:21 am
Location: Atlanta,Ga,USA

Re: Wall-0-Matic 200 Rebuild

by SteveFury » Thu Oct 10, 2013 12:33 am

Hello Rob/Ron.

I did the light bulb test on the WOM. All rivets illuminate my test light by manually rotating the wiper, and there are no obvious missing light pulses when I power the WOM through a cycle.

Therefore I assume the WOM is likely working properly... so I finished the last bit of work to do and hung it on the wall.
If I understand correctly this leaves me with an issue about the selection receiver.

I double-checked and scruitinized my work with the relays and steppers. I love to work on electro mechanical pinballs, so I have some point maintenence tools.
I cleaned all the relay and roller switch contacts again, then lightly burnished them, and cleaned them yet again. There were a couple contacts which needed *very* slight adjustment to be certain about it.

The only physical thing which seems at all "doubtful" is the letter stepper ratchet return spring. A spring should have no irregular turns in its windings, and my ratchet return spring has a bit of a space between the windings about half way up. This tells me it has probably been stressed at some point. The defect not severe, and and the ratchet seems to work normally.

I also put in my spare new 2050 tube and it still misses by one letter, particularly L-V.

Correct me if I'm wrong but I am really beginning to suspect my 5uf cap circuit and I have no means to test its true capacitence. I have two 10uf in series and if one of them are a bit out of tollerance I think it can offset the whole thing.

I need to set this project aside for a few days to catch up on other "life" issues.
Thanks again Ron and Rob for all the help, and I'll let you know how it goes when I get (another new) 5uf cap.

I got the wallbox without a lock. But not only that, it was missing it's crank, the shaft and the associated brackets were gone. Only thing remaining was the 4-point locking bars/catches.

I found the locking parts for about 45 bucks which I am NOT willing to spend. Since this is for home use, I came up with an interesing solution and I'll post a pic if I get the chance. :roll:


Rob-NYC
Senior Member
Posts: 1844
Joined: Sun Sep 25, 2011 3:05 am
Location: Manhattan, NYC USA

Re: Wall-0-Matic 200 Rebuild

by Rob-NYC » Thu Oct 10, 2013 1:29 am

A spring should have no irregular turns in its windings, and my ratchet return spring has a bit of a space between the windings about half way up. This tells me it has probably been stressed at some point. The defect not severe, and and the ratchet seems to work normally.


Steve, the tiny spring that pulls the ratchet back is critical to making sure that it is ready for the next pulse. Any "space" indicates a weakened/damaged spring.

The other point to look for is the overtravel of the gear to be sure the dog can hold it. Typically these old steppers get most of their wear in the lower letters-numbers. This leads to uneven wear on the gear teeth. If someone has monkeyed with the height adjustment on the coil assemblies it may no longer push the stepper gear far enough down during a pulse to allow the dog to catch it especially on the upper, less used teeth. Most used steppers have this uneven wear. IF there is enough overtravel it doesn't matter.

Rob.
"If we believe absurdities, we shall commit atrocities" -- Voltaire


Topic author
SteveFury
Regular Member
Posts: 99
Joined: Wed Aug 21, 2013 7:21 am
Location: Atlanta,Ga,USA

Re: Wall-0-Matic 200 Rebuild

by SteveFury » Sat Oct 12, 2013 9:33 pm

PROBLEM SOLVED!

Sometimes it is best to set something aside for a while to gain a new perspective. Today I revisited my selection receiver.

I am not sure how I saw a space in the clapper ratchet spring, it looks perfect today. It must have healed itself. :roll:

One thing I hadn't serviced yet is the letter and number rotary switch assemblies. The letter disk still had the keyed washer on the rear but was missing the front keyed washer. The securing screw still had its star lock washer, screwed directly on the fiber disk. Further, the fiber disk had a bit of rotational play. I didn't have a slotted washer so I made one by cutting a proper slot in a slug made of a steel sheet using a dremel cut-off wheel. The steel is about the same thickness as the original. Now both rotors have the keyed washers on both sides. Now there isn't any play at all on their shafts.

Someone had greased the rivets and rotors so I cleaned off all the gunk. Someone suggested WD-40 as a cleaner, so I put a drop on a clean rag and worked it on the center contact and rivets, then wiped any access with a dry rag. I put the rotary switch assemblies back together without any lubrication because I didn't see any such suggestion in the service manual. I guess that's correct.

Remember rotational play was found in the letter rotor? I adjusted the rotor to max CCW before I tightened down its screw, locking it in place. I checked switch continuity with my meter on every rivet. I have the letter fiber board adjusted maximum CW for good and reliable continuity across all rivets. I hope the fact I have the fiber board adjusted maximum CW doesn't indicate further problems.
If the letter rotor ends up rotating on its shaft across its play then I'll probably epoxy the slotted washers to it.

I double checked my roller switch settings and WALLA... My WOM selects the proper selected song. I am really just beside myself, so happy this setup is finally working properly. It's been a long road and I've learned a lot.

Thank you Ron and Rob for your suggestions.


Rob-NYC
Senior Member
Posts: 1844
Joined: Sun Sep 25, 2011 3:05 am
Location: Manhattan, NYC USA

Re: Wall-0-Matic 200 Rebuild

by Rob-NYC » Sun Oct 13, 2013 8:46 am

Steve, the fact that you had to use an extreme position for the stepper wafer is typical of a unit that has seen heavy service and the gear teeth and dogs have worn causing excessive backlash.

I have at least 5 steppers where I had to cut off a portion of the mounting slots to allow greater shifting to align the contacts with the wiper.

When it gets beyond that range I move all the wires backwards one rivet and shift the wafer all the way in the opposite direction. That is unlikely to be needed in home use.

Glad you've got it working, hope it is in your family for decades to come.

Rob
"If we believe absurdities, we shall commit atrocities" -- Voltaire

Who is online

Users browsing this forum: Bing [Bot], Google [Bot], Yahoo [Bot] and 9 guests

It is currently Thu Oct 06, 2016 11:39 am