My Intro and a Seeburg AY-160

Q&A about all types of jukeboxes: Wurlitzer, Seeburg, Rock-Ola, AMI, and more.


Topic author
SteveFury
Regular Member
Posts: 99
Joined: Wed Aug 21, 2013 7:21 am
Location: Atlanta,Ga,USA

Re: My Intro and a Seeburg AY-160

by SteveFury » Thu Sep 05, 2013 10:04 pm

SteveFury wrote:Does anyone know how to remove the two glasses? Both the one on the bottom which shows the card holders and the back glass?


Answer for anyone looking for this information:

The frame must be detached from the machine's hinge. A number of 1/4" headed screws fasten it to the hinge which is accessible when the glass/frame is swung as high as the hinge will allow. Have help from another person else it falls.

Once the frame is removed from the machine it can be disassembled at a convenient place (table etc) and so release the glass. I am in the process of repairing the paint on both glasses, and when it's time I will have 2 people help with putting it back on. One person on both ends supporting the glass/frame assembly as I put a couple screws into the hinge.


Topic author
SteveFury
Regular Member
Posts: 99
Joined: Wed Aug 21, 2013 7:21 am
Location: Atlanta,Ga,USA

Re: My Intro and a Seeburg AY-160

by SteveFury » Sun Sep 15, 2013 6:48 pm

I am mostly done with this jukebox and made a quick 3min video:
http://www.youtube.com/watch?v=bN6_uF9V1EA

I hope to send for Ron's mechanism guide soon. I plan to go through it, and this project will be done.


Ron Rich
Forum Moderator
Posts: 8193
Joined: Sun May 06, 2007 11:31 pm
Location: Millbrae (San Francisco area)CA, USA

Re: My Intro and a Seeburg AY-160

by Ron Rich » Sun Sep 15, 2013 7:09 pm

Hi Steve, and all,
Looks nice !! --while there I jumped to "how to oil your mech"--and "how to change the motor coupling"--all I can say about some of the "advice" given, is OMG !!! Ron Rich :cry:


Ken Layton
Senior Member
Posts: 292
Joined: Sun Jun 07, 2009 8:06 pm
Location: Olympia, Washington USA

Re: My Intro and a Seeburg AY-160

by Ken Layton » Sun Sep 15, 2013 7:36 pm

I've never seen an "AY" look so good. You did a fantastic job with it. Bravo! :)


Topic author
SteveFury
Regular Member
Posts: 99
Joined: Wed Aug 21, 2013 7:21 am
Location: Atlanta,Ga,USA

Re: My Intro and a Seeburg AY-160

by SteveFury » Mon Sep 16, 2013 12:24 am

Thank you very much for the kind comments Ron and Ken.

Yea, I know what you mean about Youtube advice. Someone piling rags underneath then "dripping" oil on various parts from above hoping to hit the right spot? Hmm. I like to put a drop or two on the end of a long screwdriver for those difficult places.


Ron Rich
Forum Moderator
Posts: 8193
Joined: Sun May 06, 2007 11:31 pm
Location: Millbrae (San Francisco area)CA, USA

Re: My Intro and a Seeburg AY-160

by Ron Rich » Mon Sep 16, 2013 1:18 am

Steve,
Worst part of that was, when he overstretched the clamp arm spring--them thar springs do NOT like that !!
Ron Rich


Topic author
SteveFury
Regular Member
Posts: 99
Joined: Wed Aug 21, 2013 7:21 am
Location: Atlanta,Ga,USA

Re: My Intro and a Seeburg AY-160

by SteveFury » Mon Sep 23, 2013 4:20 am

Just thought I'd mention I have a WOM 200 coming in the mail. Hopefully have it by the first week of next month.

I wanted to know if my selection receiver is working in the mean time. I have a nice 50ft run of 24g solid core wire (9 conductors) designed to be used for external sprinkler systems. I hooked it up to my selection receiver, and on the other end of the wire I've put a small microswitch from signal to ground. (N.0. contacts)

I can do a number of pulses in rapid succession, make a very short pause before doing another rapid pulses on the switch and the phono makes selections.

Looks like I will be good to go as long as my WOM works. I hope it does.

The WOM I bought is missing the lock mechanism. There's an empty hole on the side of the WOM where the lock goes.
Is it difficult to open these with the lock removed? I see references in diagrams about levers inside the WOM the lock operates and curious to know they are difficult to open (operate those locking levers) without a lock mech installed.

I am really very excited to get my WOM. Makes the days pass more slowly. Like a kid before christmas.


Ron Rich
Forum Moderator
Posts: 8193
Joined: Sun May 06, 2007 11:31 pm
Location: Millbrae (San Francisco area)CA, USA

Re: My Intro and a Seeburg AY-160

by Ron Rich » Mon Sep 23, 2013 5:12 pm

Hi Steve,
"Solid core" wire is NOT recommended for this application-3 conductor -2-16ga, and 1-18ga is what should be used ( three 16, "power cord" works well, also. Since I no longer can get the correct wire, I now use 5 conductor, all 18 ga cord {Beldon 8445}. I combine it so that I have two "power", and two "ground" wires, plus one signal wire ). Also, using the switch you have does not indicate that the stepper is functioning correctly, only that the 2050 tube is "firing". Ron Rich


Topic author
SteveFury
Regular Member
Posts: 99
Joined: Wed Aug 21, 2013 7:21 am
Location: Atlanta,Ga,USA

Re: My Intro and a Seeburg AY-160

by SteveFury » Mon Sep 23, 2013 6:47 pm

Thank you -so much- Ron for the information.
Looks like I'll go with the power cord for a poor man's cable. I'll just solder fast-on and spade lugs on the ends of the cable. Yea, you're right my switch doesn't show the receiver is working properly... Just that the tube is firing and it selects songs. The real test is when I get the wall box. I kinda got ahead of myself. Am just really excited to get this wall box, make it shine and see it work.

The real funny thing is I plan to put the box in the same room as the jukebox, probably only 20 feet away. :roll: However I plan to build a retirement home in about 9 years and this music system will be an important part of a modest game/entertainment room. If I get the stuff now and make it work then it's less hassle later.


Topic author
SteveFury
Regular Member
Posts: 99
Joined: Wed Aug 21, 2013 7:21 am
Location: Atlanta,Ga,USA

Re: My Intro and a Seeburg AY-160

by SteveFury » Mon Sep 23, 2013 7:05 pm

Funny thing is my wife didn't know what a WOM or wallbox was. She thought I was buying a whole jukebox. "What's he going to do with that big thing" she thought. So I found this cool picture of what I believe to be a 3W1 100 select WOM and now she understands what they are (I love to find old pics like these):

2ydGXws-sm.jpg
2ydGXws-sm.jpg (113.57 KiB) Viewed 906 times


Rob-NYC
Senior Member
Posts: 1844
Joined: Sun Sep 25, 2011 3:05 am
Location: Manhattan, NYC USA

Re: My Intro and a Seeburg AY-160

by Rob-NYC » Wed Sep 25, 2013 6:41 am

Hello Steve, since I have wallboxes on location I'll go point-by-point on your questions.

For wire it depends on the length of the run. For short runs of under 25 ft I use 20/4 stranded and double the negative conductor. On one location the run to a set of boxes is over 120ft there I used 16/3 type "S" to the first box and the 20/4 to the rest of that cluster.

Rowe/AMI issued 22/12 for their Wallettes which causes a heavy drop while sending. However that is what is there on the two such locations I took over, that has been there since 1973 in one a few years later on the other w/no problems.

I routinely wash all boxes and pay extra attention to the keyboards. If you don't wish to go to that extent I do suggest dousing the contacts with contact cleaner while working the buttons in and out.

After whatever cleaning you do, it is time to test for contact continuity and resistance. Connect you ohmmeter between the box chassis (red screw) and the signal wire (Blue screw) then manually turn the wiper blade over a full rotation without pressing any buttons. This will show the resistance that remains in the keyboard.

On these old boxes, especially if they have not been used recently you can expect some resistance to show up. The use of a thyratron tube makes the system more sensitive than a mechanical relay so there is more tolerance for resistance in the keyboard and wiper, but try to keep it below 200 ohms.

I routinely replace the large 5mfd@200v cap in the stepper to assure accuracy in counting. I use five, 1mfd@200v+ mylar caps on a terminal strip. There are oil filled caps for sale as nearly identical to the original, but I've used the mylar for millions of plays and never seen any point in using the old type.

The contact wafer in the stepper will probably need cleaning as the silver tarnishes and becomes gummy. For this and the wallbox wafer I use a piece of paper from a coffee filter with some contact cleaner on it followed by a manually applied coat of WD-40 (heavens!). The coffee filter is just rough enough to scour the tarnish and dirt while not damaging whatever remains of the silver plating. The WD-40 eases friction and helps the stepper wheels return "home" and it dries up long before dirt accumulates.

As for the missing lock, if the box doesn't easily open, place it on it's back and look into the hole where the lock mounts. There is a stud that you should be able to turn with a needle-nose pliers. From a locked position it turns clockwise and only 1/4th turn.

If the pliers can't grip adequately there is a hole in that stud normally used for a roll pin and you can use a small elbow Allen wrench through that hole and turned with a vise-grip pliers.

Rob/NYC
"If we believe absurdities, we shall commit atrocities" -- Voltaire


Topic author
SteveFury
Regular Member
Posts: 99
Joined: Wed Aug 21, 2013 7:21 am
Location: Atlanta,Ga,USA

Re: My Intro and a Seeburg AY-160

by SteveFury » Thu Sep 26, 2013 8:13 am

Wow Rob what an unexpected and wonderful write up.

I hope to get my 160 and the WOM200 back into a condition where they will once again be reliable for a long future, just as I do with my EM pinball and other games so I will be taking the time to go through my WOM200. I am very anxious to get my WB, which should be arriving any day now.

This is just a note to say thanks for the information.
Last edited by SteveFury on Sat Sep 28, 2013 3:11 am, edited 1 time in total.


Topic author
SteveFury
Regular Member
Posts: 99
Joined: Wed Aug 21, 2013 7:21 am
Location: Atlanta,Ga,USA

Re: My Intro and a Seeburg AY-160

by SteveFury » Thu Sep 26, 2013 11:29 pm

Please let me know if this is a really dumb idea. It's about the silver tips on the plungers for the Tormat memory unit.

Mine are wore through, or nearly wore through to the brass and rounded. I understand they are supposed to be flat, not rounded. I think Ron or Rob mentioned something about stamping silver dimes to fix this but the process is not clear.

It seems to me it would make sense to remove the plungers and take them to a jewler, where they can put a small bead of silver on the tips. The jewler's bead would likely need to be shaped correctly and polished, which would be done by me.

I made a quick illustration of what I mean. The orange stick is the brass plunger, which as a thin light gray layer on the rounded tip which is the original silver, and the dark gray represents the added silver.

1.jpg
1.jpg (18.08 KiB) Viewed 888 times


So is this a really stupid idea?
I understand I really only need 2 plungers in my machine for sides 1 and 2, and I can ground the Tormat grounding strip through a fuse as covered elsewhere in the forum. I've used my 160 already for a few hundred plays and every time it scans I am thinking about those worn out plungers.

Thanks.


Ron Rich
Forum Moderator
Posts: 8193
Joined: Sun May 06, 2007 11:31 pm
Location: Millbrae (San Francisco area)CA, USA

Re: My Intro and a Seeburg AY-160

by Ron Rich » Fri Sep 27, 2013 12:03 am

Steve,
I would suggest you not operate the phono with brass plungers only--I see no reason a jeweler can not attach silver to them--I do it here all the time. They must be filed to profile, and slightly domed, just enough so they don't "cut" the rivets. Ron Rich


Topic author
SteveFury
Regular Member
Posts: 99
Joined: Wed Aug 21, 2013 7:21 am
Location: Atlanta,Ga,USA

Re: My Intro and a Seeburg AY-160

by SteveFury » Wed Oct 23, 2013 12:06 am

Slowly but surely I'm getting all the needed work done on this phono.

I picked up the rest of the caps needed to re-cap the amp, and a couple final ones which was left to do in the controller.

The amplifier had a couple problems. First problem was distortion. You could queue up a dozen songs and you were ready to shut it off after the last few songs because the electrical noise became annoying. Second problem was the bass and treble switches did nothing. Third problem was a loud "pop" when the mechanism trip solenoid fired. It was loud enough so that my wife sitting 20 feet away would jump.

The amp had a lot of dust/dirt accumulated inside, especially on the upward surfaces. I took the unit outside and sprayed the bottom side of the chassis, particularly the components with Soft Scrub bathroom cleaner and scrubbed it good with a toothbrush. Then I rinsed it off with a gentle targeted fine mist/spray of the garden hose... being extremely careful not to get water into the transformers. Not much rinsing water in those areas.
I knew it would be a few days until I got my parts, so I set the chassis under a 75watt light bulb. The bulb warmed the 3 transformers... Particularly the power transformer, keeping them very warm which evaporated any water left inside.

It is evident I'm the 3rd person who has replaced parts. Looks like the 1st person replaced most of the caps and did a good job. Leads strung through terminal holes, looped and soldered. Looks like a 2nd person replaced a couple caps and couldn't solder. One of those poor joints was found broken on an output transformer coupling cap, so only 1 side of the transformer could have been working. I bet that's part of the distortion.
So I replaced all the coupling caps, plus the 200uf 6v on the AVC circuit along with the main power supply caps.

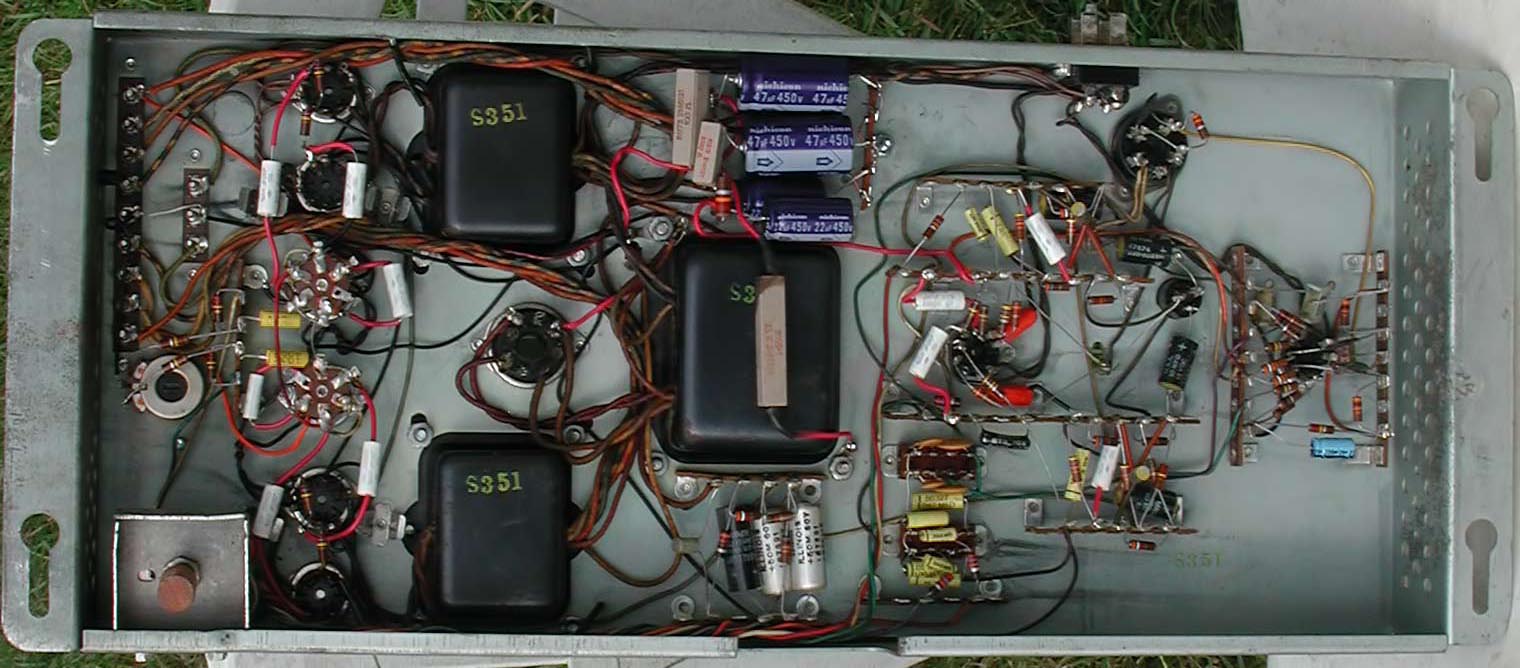
I did a bit of an error on the power supply caps. I originally put the resistors below the new caps and It looked really nice. Then I realized the resistors would heat up the electrolytic s so I had to flip it around and it looks a bit funky... Especially the resistor along the back side of the transformer. Oh well, it works.

In fact I am extremely pleased the way this has turned out. All the noticeable distortion has vanished, both tone switches work and the loud mech "pop" is gone. The sound of the phono was strong before, but more so now. I have the bass set to middle because it's boomy in the 20x30ft room if put on high. Mostly mid-range sound without much highs but I assume that's because of the singe pair of 12" speakers.

Everyone likes photos, so here are a few.
I took the time to map out the amp components. I've included it and maybe someone might find it helpful. I don't believe there to be any errors as it pertains to my particular amp.

Sorry for the larger files. I didn't want to loose resolution...
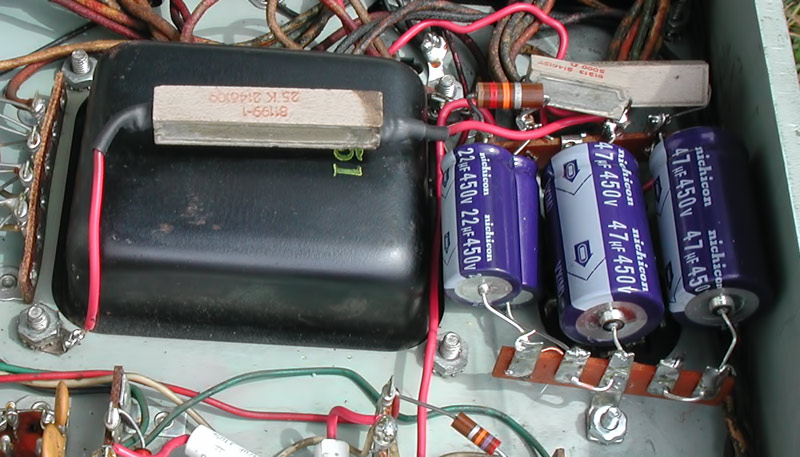
Amp Components.png
My SHFA4 Amp components map
(437.42 KiB) Not downloaded yet

Power-Supply.jpg
Funky power supply
Power-Supply.jpg (108.26 KiB) Viewed 840 times
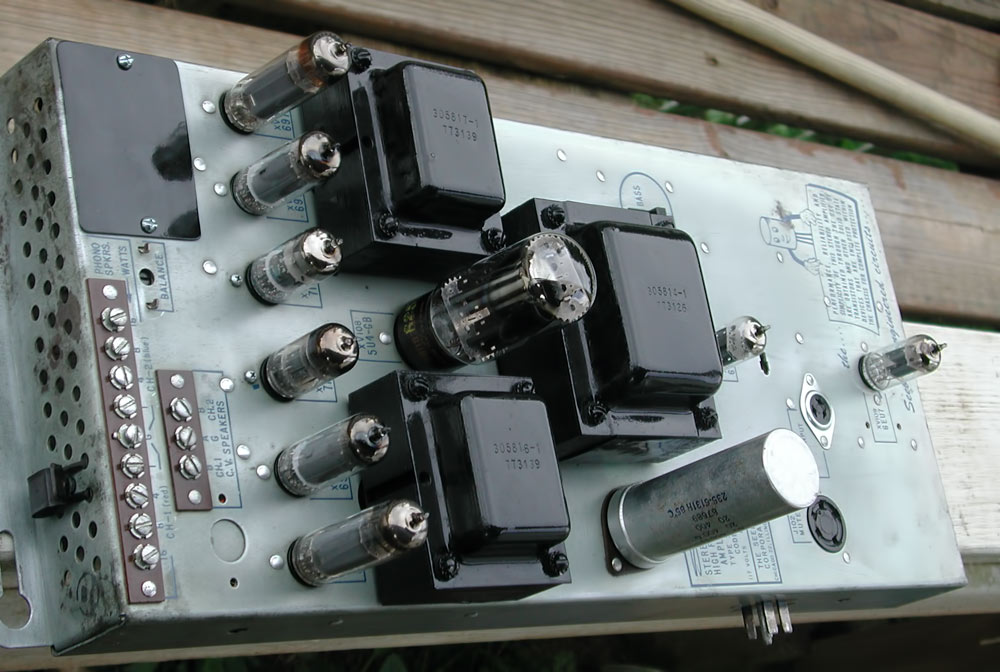
Amp-Components.jpg
Amp Components
(157.64 KiB) Not downloaded yet

Finished-Amp.jpg
Finished Amp
Finished-Amp.jpg (117.99 KiB) Viewed 840 times


I snapped a couple photos of the Tormat Controller power supply tubes I thought was interesting:
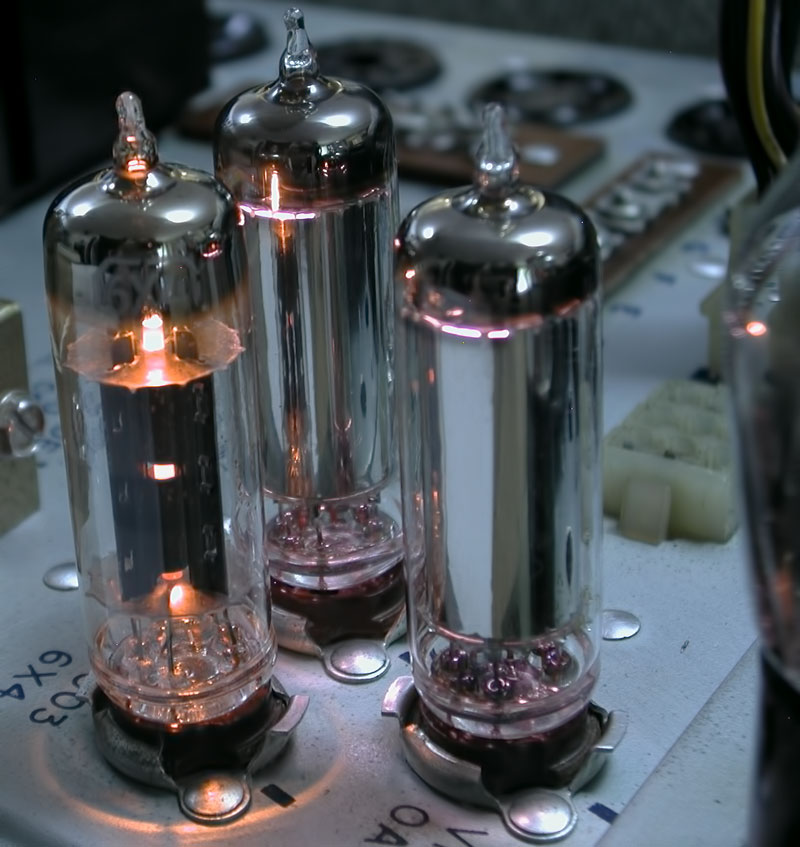
Tubes-2.jpg
Tubes!
Tubes-2.jpg (106.57 KiB) Viewed 840 times

Tubes.jpg
More tubes!
Tubes.jpg (104.54 KiB) Viewed 840 times

0A2.jpg
Cool 0A2 regulator tube!
0A2.jpg (104.22 KiB) Viewed 840 times
Last edited by SteveFury on Wed Oct 23, 2013 1:34 am, edited 5 times in total.

Who is online

Users browsing this forum: No registered users and 9 guests

It is currently Thu Oct 06, 2016 11:38 am